Pulsar PSR logo
Features
Sales
Android POS Device Desktop POS Cloud Based POS Android POS Mobile App Bill Payment Card Acceptance P2P Payments
Business Process Automation
POS E-invoicing(Egypt Tax Authority) E-receipt(Egypt Tax Authority) Tecards, weighing goods Customer Display POS Software Kitchen Display Software Barcode Price Checker Software QR Menu SDK/API For Enterprise
Clients
Clients Relationship Management(CRM) Online Ordering-Delivery System Offers & Promotions
Management
Management Application(IOS, Android) (soon) Charts Analytics HRM (Soon) Loyalty Programs
Inventory
Suppliers & Purchases Inventory Management
Solutions
Retail
Grocery Store Online Store Supermarket Bakery Shop Eye wear shop Gift Shop Jewelry Store Furniture Store Clothes Shop Butcher Shop Perfume Store Tourists Products Shop
Food Service
Fast Food Restaurants Candy Shops Café & Restaurants Restaurants' Kitchen Food Delivery
Electronics
Mobile Shop Computer Shop Home Appliances
Medicine
Pharmacy Beauty Centers Laboratories Dentistry Doctors Clinics
Others
Cleaning Services Travel And Tourism Agencies Real Estate Agencies Training Centers Fitness & Gym Financial Services Air Conditioner Services Maintenance
Pricing Guides Blog Contacts
Call me
EGYPT
UAE
EN
AR
Features
Sales
Android POS Device Desktop POS Cloud Based POS Android POS Mobile App Bill Payment Card Acceptance P2P Payments
Business Process Automation
POS E-invoicing(Egypt Tax Authority) E-receipt(Egypt Tax Authority) Tecards, weighing goods Customer Display POS Software Kitchen Display Software Barcode Price Checker Software QR Menu SDK/API For Enterprise
Clients
Clients Relationship Management(CRM) Online Ordering-Delivery System Offers & Promotions
Management
Management Application(IOS, Android) (soon) Charts Analytics HRM (Soon) Loyalty Programs
Inventory
Suppliers & Purchases Inventory Management
Solutions
Retail
Grocery Store Online Store Supermarket Bakery Shop Eye wear shop Gift Shop Jewelry Store Furniture Store Clothes Shop Butcher Shop Perfume Store Tourists Products Shop
Food Service
Fast Food Restaurants Candy Shops Café & Restaurants Restaurants' Kitchen Food Delivery
Electronics
Mobile Shop Computer Shop Home Appliances
Medicine
Pharmacy Beauty Centers Laboratories Dentistry Doctors Clinics
Others
Cleaning Services Travel And Tourism Agencies Real Estate Agencies Training Centers Fitness & Gym Financial Services Air Conditioner Services Maintenance
Pricing Guides Blog Contacts
Call me
Log in
By using this site, you accept Cookies Policy
Accept
Help & Support Center
Goods & Services
Create a new product
Getting started with Pulsar program and its features
How to start working with Pulsar?
Goods & Services
Create a new product
Editing а product
Deleting a product from the products catalog
Import and export products
Price tags and labels
Working with products groups
Configure the products catalog
Minimum quantity
Inventory Control
Record the products sale via Personal Account "Sale"
Record the sales returns via Personal Account "Sale Return"
Record the products acceptance "Purchase"
Returning purchased products to the supplier “Purchase Return”
Inventory of products in the store "Inventory Checking"
Accounting write-off of products “Write-Off”
Move the products between stores "Transfer"
Assembling the products into a set "Assemble"
Disassembling a product set intngo sile items "Disassemble"
Change the products retail prices "Revaluation"
Catering & Production
Product components card
The Produce Operation
Recalculation of the dish's purchase price
Reports & Analytics
Product Movement Report
Clients / Suppliers Balance report
The Inclusive Tax Report
Expiration Period Report
Analytics in the product card
The Online Store
Online Store Creation
CRM/SRM/Customers & Suppliers
Creating a customer or a supplier card
Payments: Exploring customers & suppliers payments
Settlements with customers & suppliers
Integration with ETA to submit the e-invoices & e-receipts
E-invoices & E-receipts exchange with ETA
Fill in the organization’s information
Prepare to send the electronic invoices (e-invoices)
Send the electronic invoice (e-invoice) to ETA
Prepare to send the electronic receipts (e-receipts)
Send the electronic receipt (e-receipt) to ETA
CashReg cashier software and its features from A to Z
What is a CashReg program ?
Initial connection to work with the cashier software CashReg
Getting started with the cashier software CashReg
Install the cashier software CashReg
Connect a scale for products that need to be weighed
Sales settings for the cashier software CashReg
Device settings to work with the cashier software CashReg
Sales rules settings in the cashier software CashReg
Point of sale (shop) settings
Employees settings
Operations in the CashReg program
Open the shift in the cashier software CashReg
Add a product to the products catalog
Record the sales in the cashier software CashReg
Record the sales returns in the cashier software CashReg
Deferred receipt in the cashier software CashReg
Closing shift (Z report)
Reminder about working with the CashReg program
PULSAR POS-Device
Adding new goods & services on the Pulsar POS device
Purchase goods & services "Goods Acceptance" by the Pulsar POS device
Sale goods and services "Sale" by the Pulsar POS device
Record the goods & services returns by the Pulsar POS device
Products write-off on the Pulsar POS device
Return purchased goods to suppliers by the Pulsar POS device
Conducting inventory of products by the Pulsar POS device
Purchasing & changing retail prices by the Pulsar POS device
pos products point of sale

Create a new product

A new product catalog can be created in different ways, manually or by importing from Excel. It is possible to create a product through the web interface, POS device or mobile application.

Create a card of a new product manually or by using a scanner

On the Products tab, press the button "+ Product" on the control panel.

1

In the opened window Create a new item, fill in the required fields, and press the button Save.

When creating a product card using a scanner, if there is a manufacturer's barcode and integration with ETA, the application will suggest using the name and description from the barcode database. You can modify them if necessary.

If a product doesn't have any barcode, you can generate it.

Copy products from the database

This method is suitable if you often need to create the same type of product.
To copy, on the tab Products tick the checkbox for the required item and press on the button Copy on the control panel.

3

In the opened window Create a new product, check and, if there is a necessity, to edit the required fields and save the product card.

From the operations

A new product can be created from Purchase, Assemble, Disassemble, Product components card , and Transfer.
To do this, click on the '+' button in the relevant operation.

Features of creating a product from the operation Purchase :
If there are new items through goods supplying that were not previously in your point of sale (store), the application will offer you to create a product that is not found in the catalog. When creating a product from an operation, fill in the card fields carefully. You can't specify the quantity of goods in the card! The quantity will be automatically saved to the card after you confirm the operation.

Import from excel

The fastest way to create large lists of new items is Import via Excel. You can use spreadsheet files, that are compatible with Excel for uploading.

  1. Go to menu Import from Excel.
  2. Download the template, enter your goods there.
  3. Transfer the completed file to the upload area.
  4. Check that the fields match and confirm the upload.

Learn more about items uploading using import.

Upload all your products quickly and easily to the app!
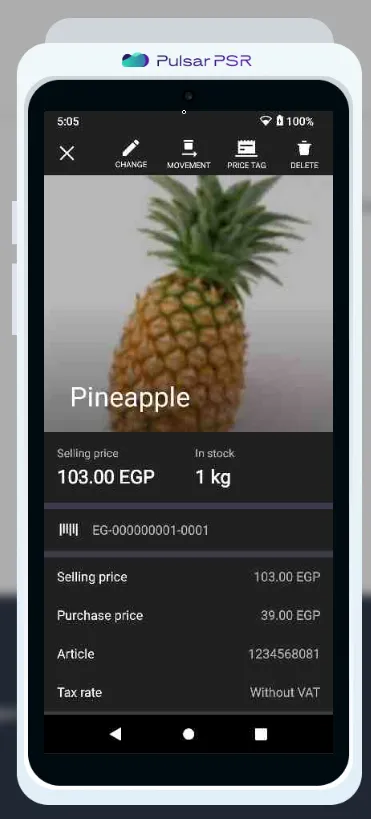
Your browser does not support the video tag.

Product card fields

No matter how you created the product, carefully fill out the product card.

Common fields:

  • Name - text field. You can nominate it manually, or the program will fill in the name from the barcode database if you scan the factory barcode of a new product, аnd the integration with ETA is configured on your side.
  • Article and code - by default, it is substituted by adding one to the largest previous value. You can set an arbitrary value without using any special characters.
  • Barcode - if the product has a barcode, enter it manually or using a scanner; if the product doesn't have any barcode, generate it in the application.
  • Product type - carefully choose the right type, "Product" will be set by default. If you specified the "Service" type, so sales and sales returns of the selected product will not change the balance.
  • Group (optional field) - select a catalog from the drop-down list.
  • Quantity - the amount of goods. Pay attention! You do not need to specify the quantity in the product card when creating a new item! The quantities are formed from goods movement documents ( Purchase , Write-off, Inventory checking, etc.).
  • Purchase price - the purchase price of the goods. This parameter is set by the Purchase document when the goods are receipted from the supplier. After the first acceptance, the purchase price will be automatically saved to the card, from the Purchase document.
  • Selling price - selling price that will be shown on the price tag. This parameter is also set by the Purchase document upon receipt of goods from the supplier, or by the Revaluation document, if it was necessary to change the retail price.
  • Unit of measure - choose the suitable value from the drop-down list.
  • Container volume (optional field) - indicate the volume according to the selected unit of measurement.
  • Description (optional field) - text field for free assignment, which can be displayed in the price tag.
  • Tax - choose the appropriate value from the drop-down list. By default, "Not subject to VAT" is set.

Product Images

In the product image block, you can upload up to 10 images. They will help navigate a large product database and quickly view product properties, for example, by taking a photo of the composition on the packaging or uploading usage instructions. Also, product images will be displayed in the online store catalog.

  1. Select the goods you want to add images.
  2. Upload no more than 10 images.
  3. Set the title image (it’ll be shown first).
  4. You may delete one extra image or all of them at once, If it is necessary.
  5. Save your changes.
Your browser does not support the video tag.

If you're using the PULSAR POS-Device, the image you assign as the main photo for a product will automatically be added to the product card on the POS device. It will also appear next to the product in the products catalog, making it easier and faster to identify the item at a glance.

Screenshot 2024-10-30 160515

Learn more about the features below.

Requirements for uploaded images

Format: JPEG, PNG, JPG.

Size: Not exceeding 20 MB.

Resolution: From 300 to 10000 pixels.


Adding images

To add images, you can do it in two ways:

  1. Click the Upload button and select the images in the opened window.
  2. Drag the images directly into the upload area.

To select the main image, which will be displayed in the product catalog, hover over the picture, and click on the star icon.

If you want to delete an image, hover over the picture and click on the trash can icon.

To delete all product images, click Clear all images.

Products with uploaded images are displayed in the product registry with a camera icon in the Photo column (by default, this column is hidden).

In the article
Create a card of a new product manually or by using a scanner Copy products from the database From the operations Import from excel Product card fields Product Images
Pulsar PSR логотип
info@psr.com.eg
Resources
Guides Blog License Agreement
Company
About PSR Contact Careers
info@psr.com.eg Privacy Policy
Privacy Policy
© Pulsar for Information technology L.L.C, 2023

All details will be sent to
you via email

By sending your details you agree to the privacy policy

Сall you back

Enter your phone number and we will call you back
By sending your details you agree to the privacy policy
Your request has been
submitted successfully