Price tags and labels
The Price tags module allows you to print both price tags and labels.
You can set up the settings for price tags that are appropriate for you and save them to use in the future.
- Open the price tags printing dialogue box.
- Add products.
- Select the fields you want to see on the price tags.
- Download the file with price tags and print it on your device.
- Save the print settings.
Learn more about the features below.
How could the price tags and labels help you?
With the module you will be able to:
- Change product’s name and description before printing price tags;
- Print price tags according to the quantity of the goods remains;
- Disable and enable fields to be printed: name, description, price, barcode, code or article;
- Print price tags for promotions and discounts, the "Old price" field will be crossed out and the current price can be highlighted in color;
- Include additional upper and/or lower text fields in the price tag and fill them with arbitrary text, such as the name of the organization;
- Customize the size of the price tag or label;
- Easily add products by scanner, through the search bar or automatically by product group.
Adding a product
You can add a list of items to print price tags in several ways.
From the module price tags
- In the Products tab, click the Price tags button -> Open price tag settings.
- In the Select products section, add products to the table part: through the goods search bar (you can use the scanner) or through the selection of a group or groups of goods in full.
In the Products tab
- Open the Products tab;
- Check the boxes next to the items or use bulk selection of products;
- Click the Price tags button on the control panel;
- Choose the quantity of price tags for each item: either 1 piece or based on the on the amount of products remaining in your point of sale (store) (for negative values, 0 will be set).
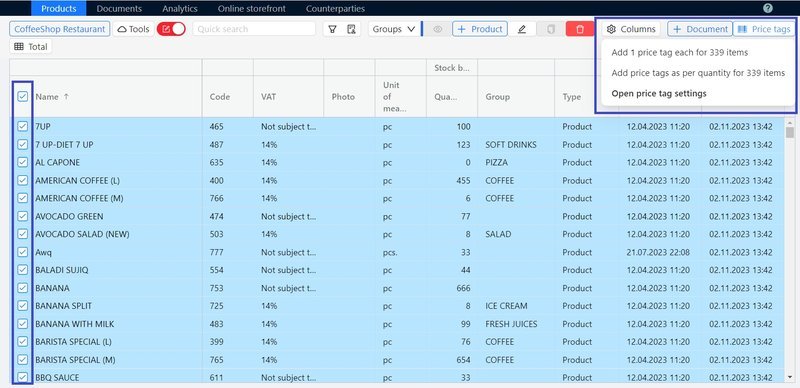
- The selected items will be added to the Price tags module.
- To continue working with the module, click the Price tags button again and select Open price tags settings.
When adding goods that are already added to the module, the number of price tags to print will be increased. The number of price tags for each item can be set or edited manually in the tabular part of the Price tags module.
___________________________
** To work quickly, select a large array of the list, check the checkbox at the top of the list, then go down the list, hold down Shift on your keyboard, and check the bottom line of the list
From the operations
In the Purchase and Revaluation operations, there is a possibility to add items to the Price tags module and print price tags and labels for these products.
When adding this way, it is possible to select single items or the entire list from the document, and set the number of price tags - by 1 piece or by the number of received products during the purchasing operation.
How to edit Price tags
Editing a text
Before printing the price tags, you can edit the name and description of the goods. This will be convenient for users who, due to the specifics of their business, have very long goods names or sell the same kind of goods in assortment. Also, the Description field can be used to draw attention to promotions and discounts for this product.
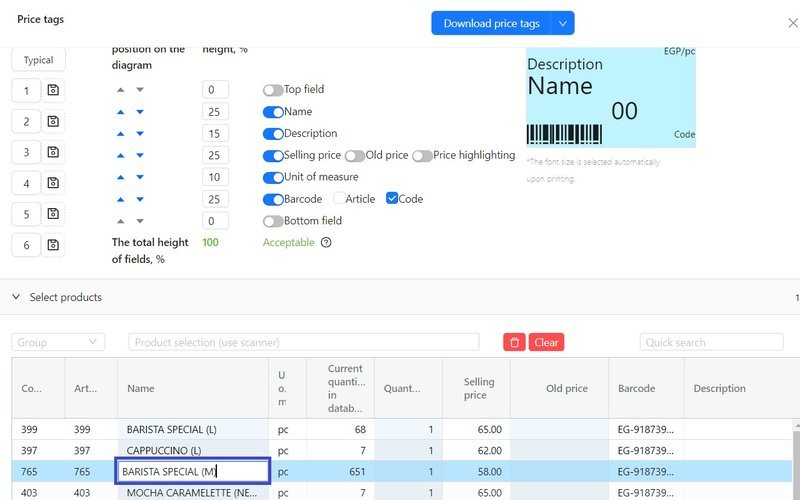
Please note: The changed name and description will be displayed in the price tag, but will not be saved in the product card.
Setting up price tag fields
You can enable or disable the fields printed on the price tag or label depending on your needs. For example, print only the barcode of a weight goods. Or, on the contrary, to display additional text fields, where you can enter the name of the organization or the date of price tag printing.
Change the product sorting before printing, for example, arrange price tags on the sheet by article, code, or in alphabetical order.
Increase/decrease the fields of price tags according to the selected size and change the arrangement of fields relative to each other.
For correct PDF printing, the total height of fields should not exceed 100% (the figure is displayed below the price tag scheme). In case of exceeding the permissible size, a warning will appear, indicating the need to adjust the parameters.
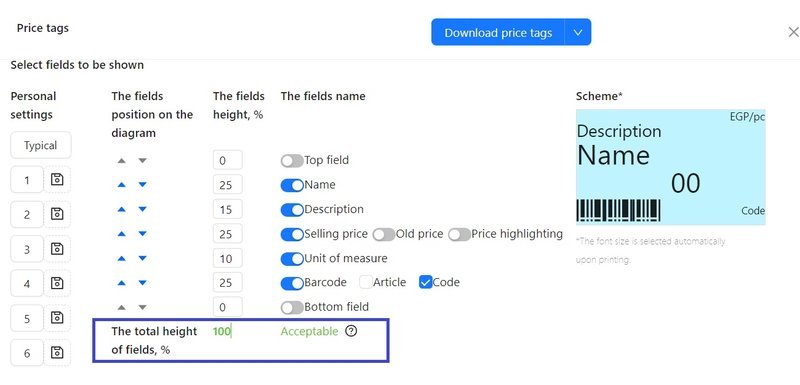
Available number of fields that can be included in the price tag: goods Name, Description, Unit of measure, Selling price, Old price, Barcode, Code or Article, Top text field, Bottom text field.
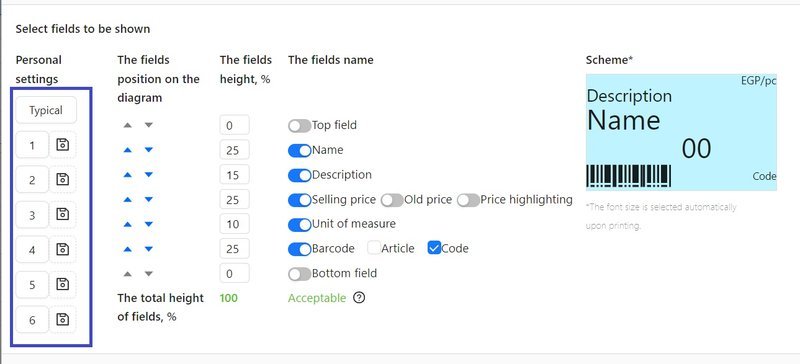
To save a set of selected fields, click on the floppy disk icon to the left of the field constructor. This way, you can save six different configurations.
Price tags with discounts
If you need to draw additional attention from customers to promotions and discounts on goods, you can use the Old price block. What do you need to do?
- In the price tag window, enable the Old price section, you can optionally enable additional highlighting of the new price.
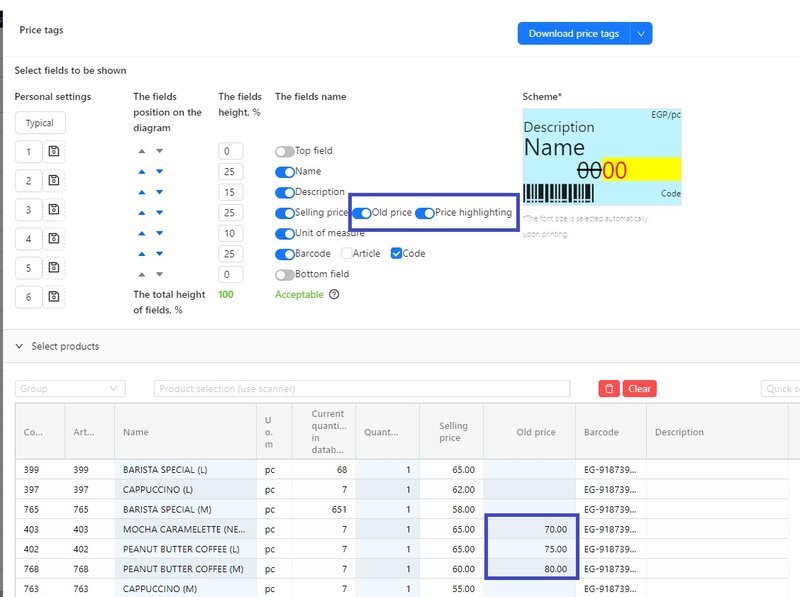
- In the tabular part of the Price tags module, specify the old price that "used to be effective". This price will be crossed out on the price tag, and the current price from the goods card will be reflected in the price tag as the new price with a discount.
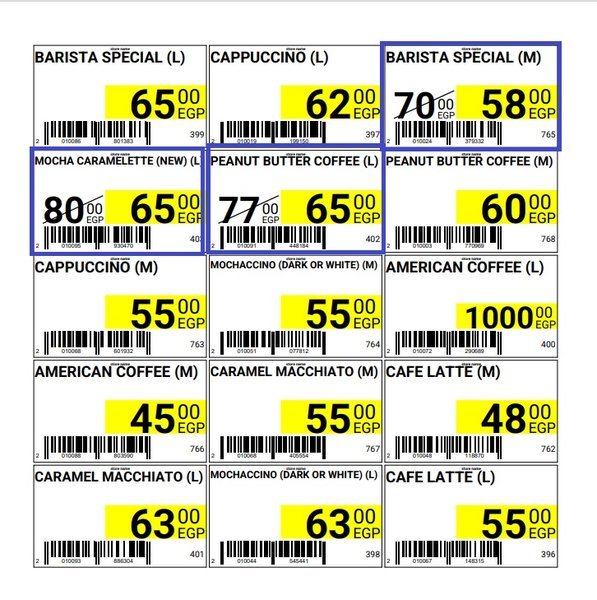
Additional information about promotions or discounts can be specified in the Description field if desired.
Price tag printing options
There are preset formats, such as A4 or label printer tape.
If the existing formats do not suit you, you can specify your own custom format.
The Designer allows for very flexible customization of the desired height, width and indentation between price tags. The height of one price tag is specified manually. The width of the price tag is calculated automatically depending on the selected paper size and number of columns.
To print labels, select Tape mode, and then specify the width and height of the label to be used and the size of the internal indent, usually 1mm.
To print regular price tags, select A4 mode, specify the desired price tag height and internal indent, and specify how many price tags you want to fit across the width of the sheet.
After all the settings are made:
- Click Download price tags in the header of the module and wait for the file to be downloaded to the Downloads folder. If you have trouble downloading, check your browser settings. It can block multiple downloads from one site.
- Open the file in PDF format, make sure you are satisfied with the result and print the file to an ordinary printer or label printer.
Please note! Print quality and label layout are controlled by the printer settings.
Completing the Price tags module
When the work with the price lists is finished, clear the table part using the Clear button. If for some reason you forgot to do this, the program will ask what to do with the existing list of goods, save it for further work or clear it.
If you have finished your work аnd printed the price tags, click Clear,
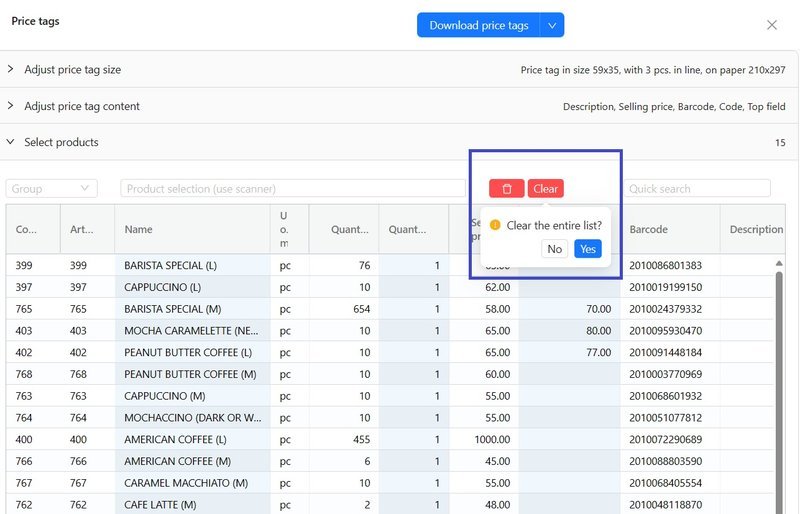
but if you plan to continue working with this list of goods a little later, when you close the document, select Save. You will be able to continue working with the entered goods at a later time.
Please note! If you have previously worked with the module, but did not clear the form when you finished, the next time a new product will be added to the previously saved list.