Working with products groups
Customize the details you need by product groups and subgroups. This will allow you to easily manage the group's inventory and track balances.
To work with groups, go to the tab Products . By default, the tab is in Safe Browsing Mode. If you need to change or delete a product group, switch the interface to edit mode (the slider in the left block of the control menu should be in the active position and highlighted in red) .
Choose a convenient display mode for the group filter. Two options are available. By default, the first one is set — a dropdown registry in the top panel on the Groups button. The second option can be displayed in the side menu, to the left of the list of products. To switch to it, in the Product Groups filter, click Show groups on the left.

Creating a product group
To help you navigate the products catalog more easily, create groups.
- Open the Groups section on the Products tab.
- To add a group, click "+" to the right of the top row that says All Groups.
- Name the group and save by pressing Enter on the keyboard or clicking the floppy disk icon.
- To add a subgroup, click "+" to the right of the selected parent group.
- Click on the triangle icon to the left of the selected parent group to expand it.
- Name the subgroup and save it by pressing Enter on the keyboard or clicking the floppy disk icon.
- The group and subgroup have been created. Learn more about applying subgroups.
If you want to always see the window with groups on the screen, click the Show Groups button on the left.
If you want to see on the screen only the products of a specific group, uncheck All Groups to hide the display of all groups and check the box next to the group you want to work with.
Editing a product group
Edit Group Name
To modify the name of a group:
- Enable the editing mode on the Products tab.
- Open the Groups section.
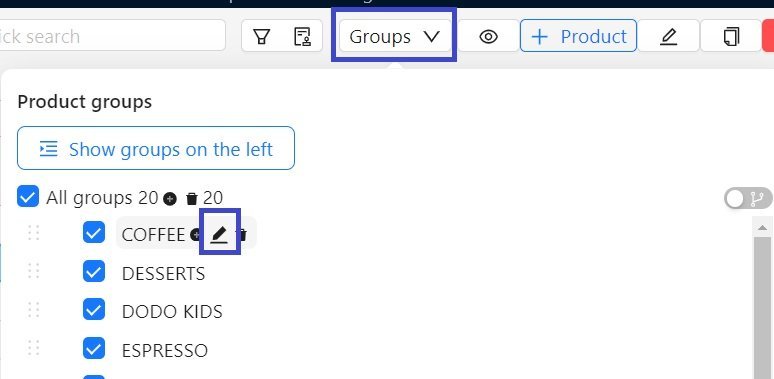
- Click on the edit option, which is located as a pencil icon to the right of the group name.

4. Make your changes and save them by pressing Enter on your keyboard or the floppy disk icon.
Edit Group Nesting Level
To adjust the nesting level of a group:
- Enable the editing mode on the Products tab.
- Open the Groups section.
- Select the group you want to move and drag it under the parent group.
Hierarchy of products groups
The hierarchy of groups is necessary for points of sale (stores) with a large assortment. For example, you have two large groups: "Food" and "Non-Food". Within the “Food products” group there may be second-level groups “Dairy products”, “Baked products”, “Sausages”, etc., and in “Dairy products” there are already third-level groups, for example, “Cheese”, “Milk ", "Kefir". Within the subgroup of the third level are the goods themselves.
Create a hierarchy of product groups using two methods:
- Manually create groups and subgroups.
- Upload the hierarchy of product groups through Excel.
To upload the hierarchy of product groups through Excel, in the file prepared for uploading, specify the group name in the Group column and indicate the group hierarchy in the Group Structure column in the format Group 1\Group 12\Group 123, where Group 1 is a group of the first level, Group 12 is the second level, and Group 123 is the third level, respectively.
After importing the hierarchy of product groups, switch to the Products tab and check the correctness of the uploaded hierarchy.
If the imported file contains groups with names that already exist in the register of groups in the application, these groups will be skipped during import and not created. Please double-check the Group and Group Structure columns.
Deleting a product group
If a product group isn't used anymore, you can delete it to keep the directory uncluttered.
- Enable the editing mode in the Products catalog.
- Click the Groups button.
- Click on the trash bin icon next to the name of the group you want to delete and confirm the deletion.
Important! You cannot delete a group that contains products or other groups. First, empty the group - delete or move all products to other subgroup.
