Record the products acceptance "Purchase"
If a shipment arrives at your point of sale (store), you need to add it to the point of sale (store) so that the products with new prices and quantities appear in the app.
To determine the optimal time to purchase each product before it runs out, simply use the Minimum Quantity Report. This report helps you avoid stockouts of the best items and enables you to meet your customers' demands for various goods.
You can also learn how to buy products from your suppliers using in the mobile application & Pulsar POS device.
The documentation for receiving products from suppliers in the web version is more convenient for the following reasons:
- No need to occupy the mobile device, tearing the cashier away from sales.
- Price tags for all products receipt can be printed directly from the operation can be done remotely, having an invoice from the supplier at hand.
- You can quickly calculate and set new selling prices for products using the built-in tool.
Creation of the operation
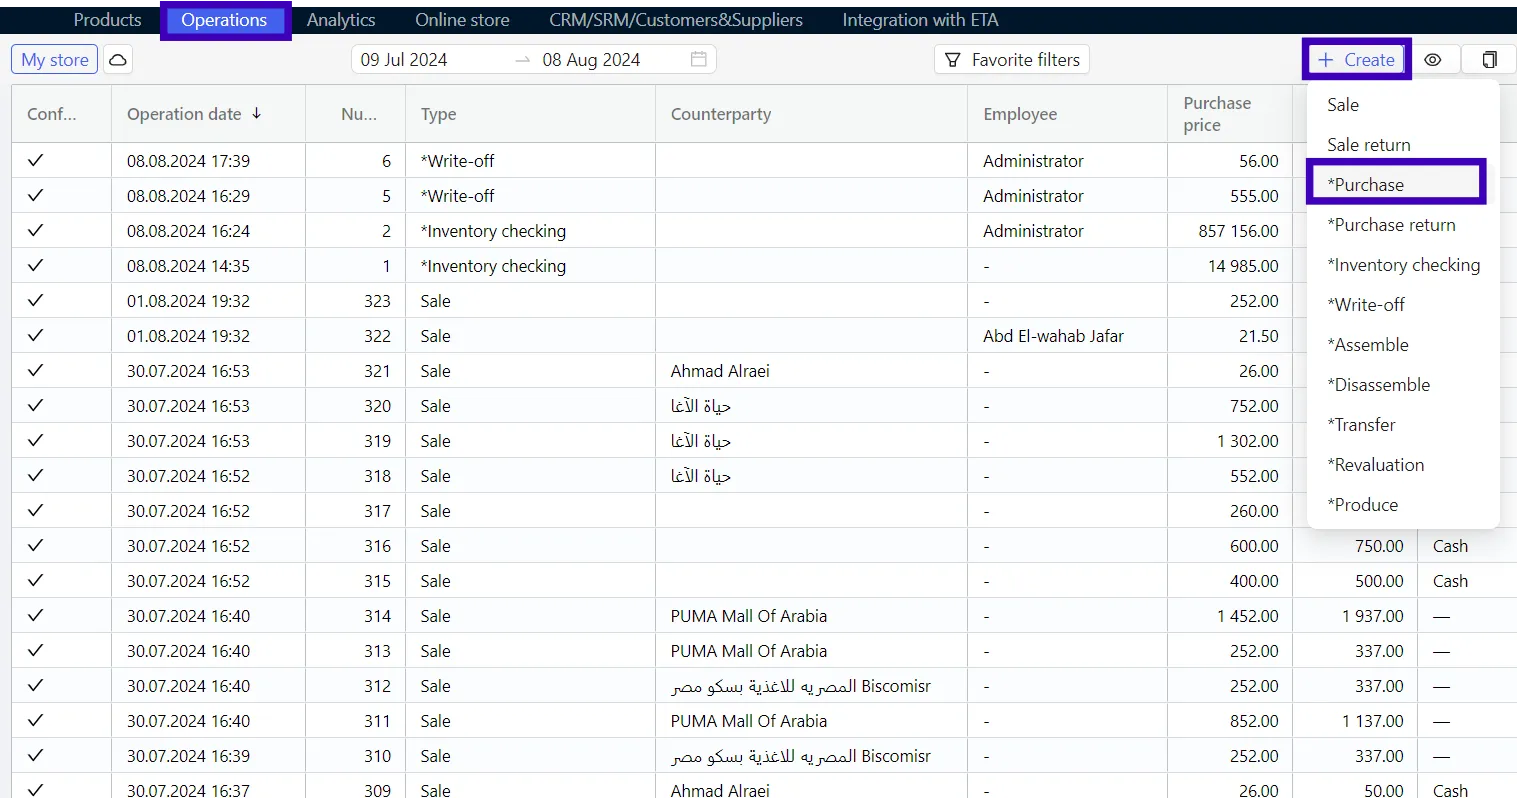
- Go to the Operations tab - Inventory control. On the top management menu, press + Create and select Purchase operation.
- In the operation header, select the point of sale (store) to which the products were purchased. The fields Employee and Comment are optional.
The operation number and date are generated automatically.
All operations are created only with the current date.
To create an operation from the Products tab:
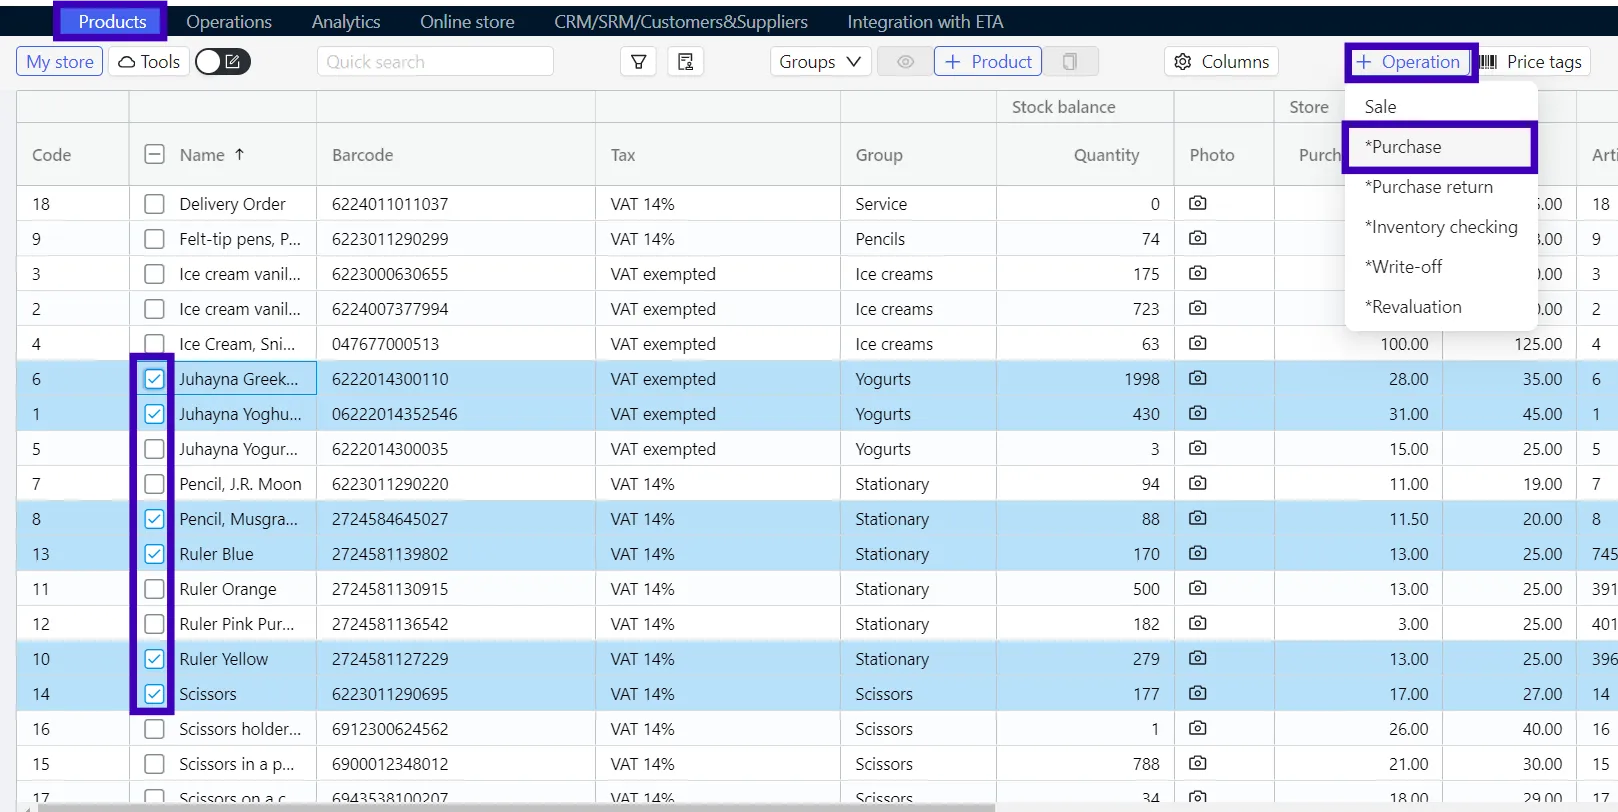
- Select one or more products that you are going to purchase. If you want to select all products - check the Name box in the column header.
For easy group selection of products, use filters or group selection. - Click +Operation in the top menu.
- From the drop-down list, select Purchase.
The selected products will be added to the tubular part of the operation.
Tabular part
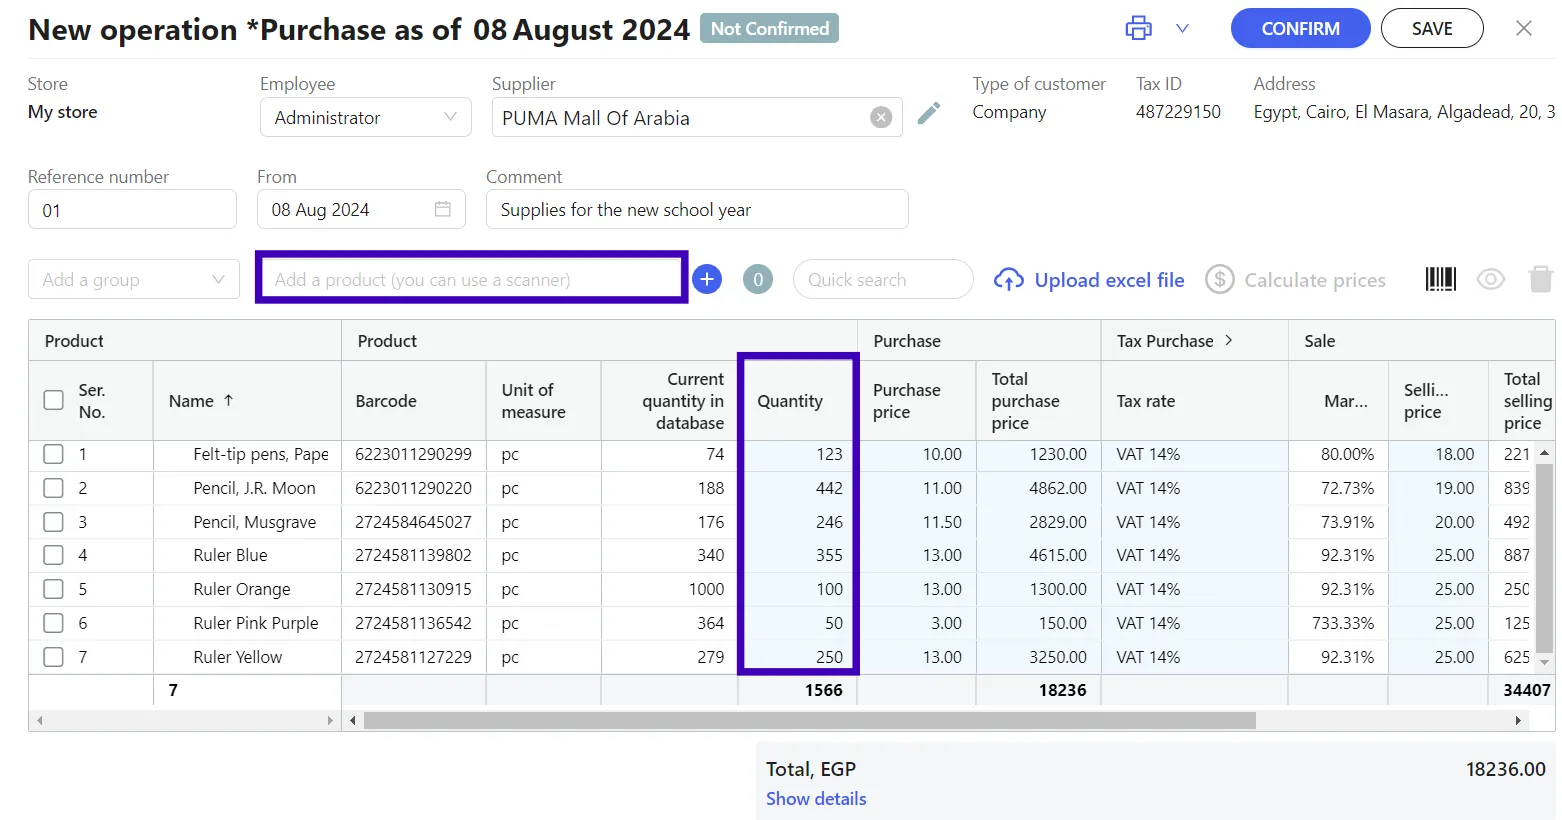
- Fill in the tabular part of the operation through the product selection line either by manual search or by using the scanner.
- When using the scanner, place the mouse cursor in the product selection line, then proceed to scan the barcode.
- If you need to purchase an entire product group, you can fill in the table part by selecting one or more groups in the drop-down list on the left side of the product selection line. In this case the operation will be filled automatically with all items of the selected groups.
- Set the quantity for the selected items. This can be done manually or by reading the barcode with the scanner several times, each reading will add +1 to the quantity.
- For a product that was previously in inventory, the purchase and selling price will automatically be uploaded from the product card. If the purchase price has changed in the delivery - specify the new purchase price and selling price in the table.
Purchase a new product
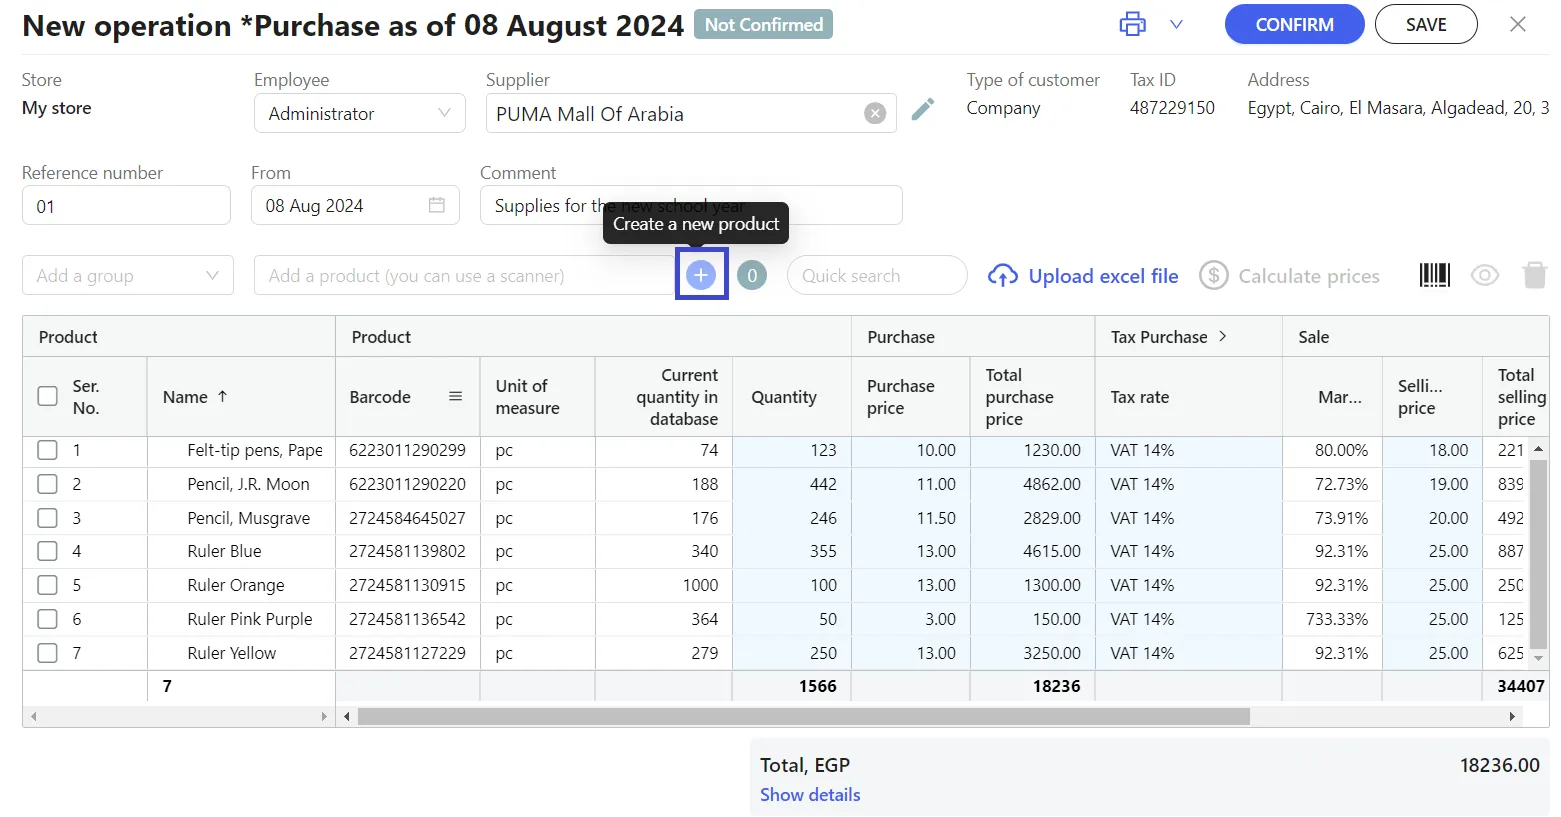
- If the shipment contains items that were not previously in the point of sale (store) (manual search by name and scanner failed), the program will offer to create new products.
You can also press the ADD (+) button to create a new product.
The product card opens where you need to enter this information in it:
- Name
- Unit of measure
- Barcode: for a product without factory barcode, it can be generated in the product card or you skip this field.
- Group
- Type (“Product” are checked by default)
- Article code (the field is optional)
When you complete the product data in the operation, the new barcode will go into the card automatically, and then the program will propose you to use the name and units obtained from a database of barcodes.
Please note! In the product card it is not necessary to specify the quantity, selling and purchase price. These data will get into the product card after you save the operation Purchase.
Tabular part: Upload from Excel
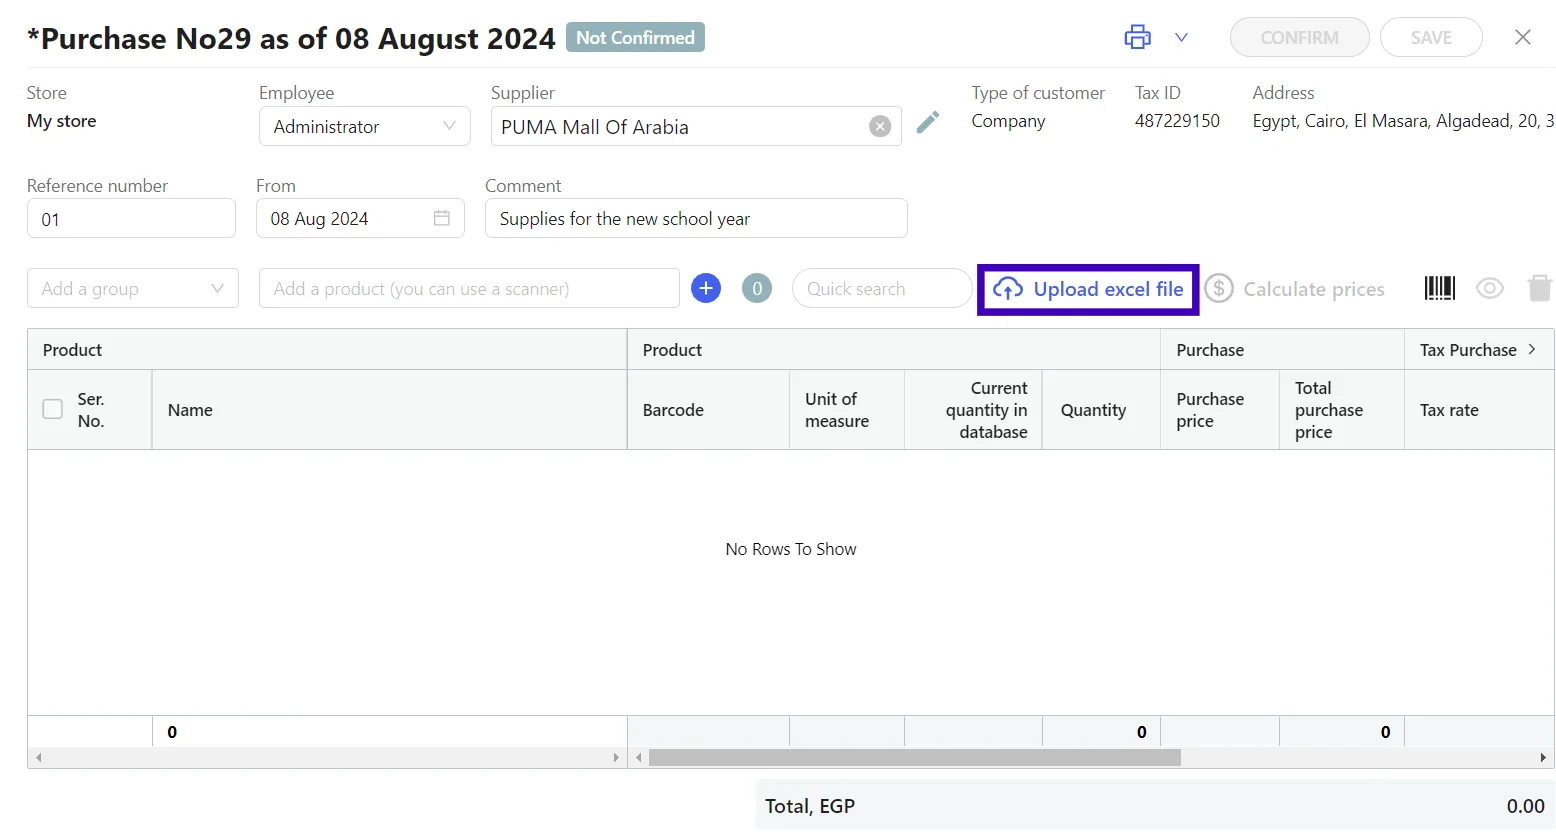
To import data into a Purchase, click Upload excel file.
- Follow the recommendations on the Import from Excel page as you prepare the file to upload. You can also learn about the steps to import the file from Excel here.
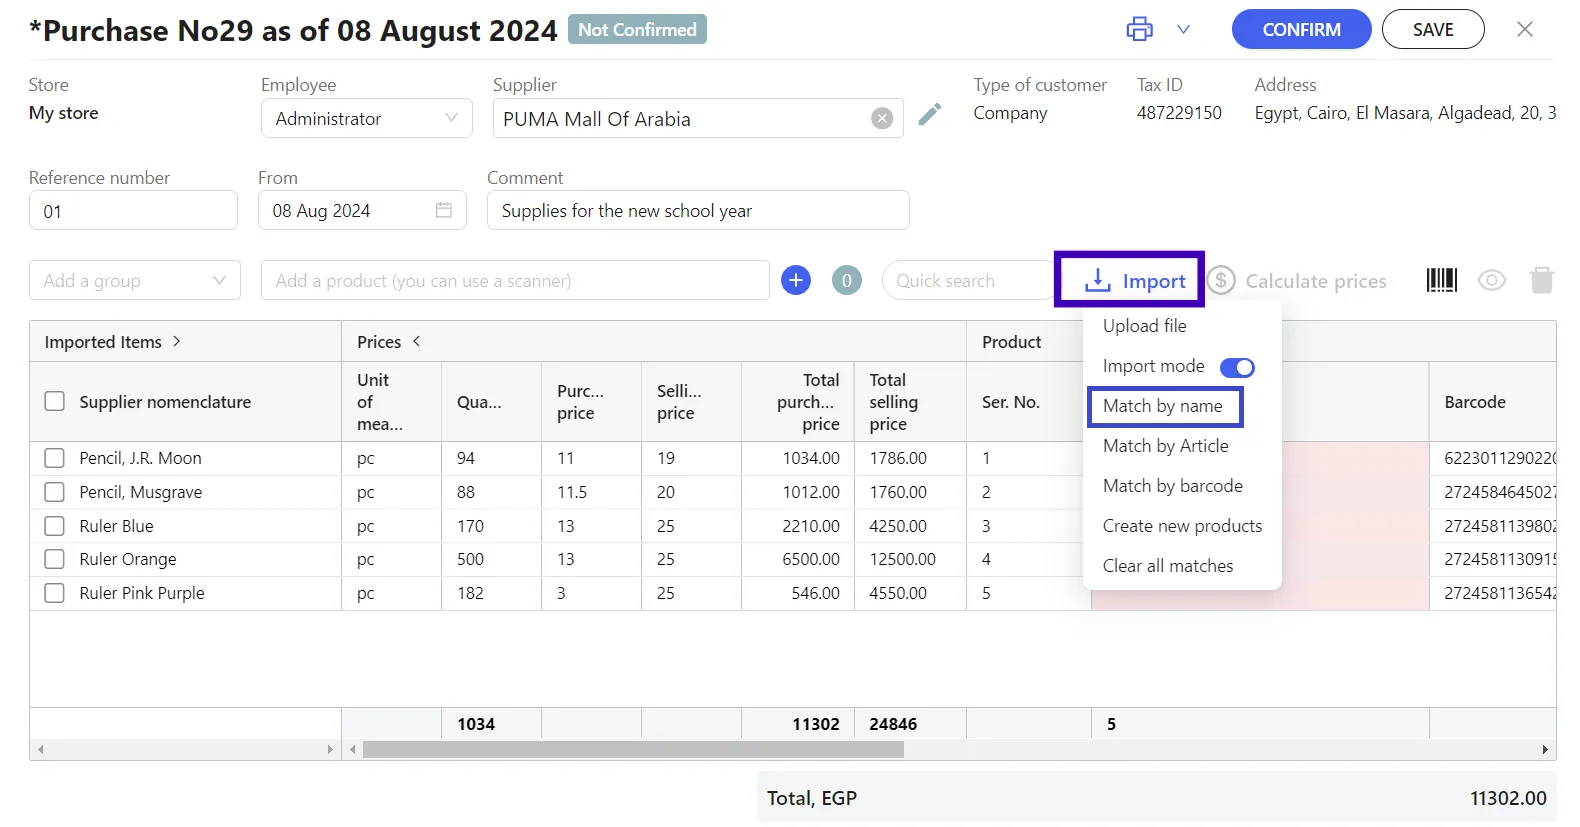
When using the import option, the tabular part of the operation is modified, the left and right parts of the table appear:
- The left part is the uploaded data of the supplier's document;
- The right part is the user data of the Purchase operation.
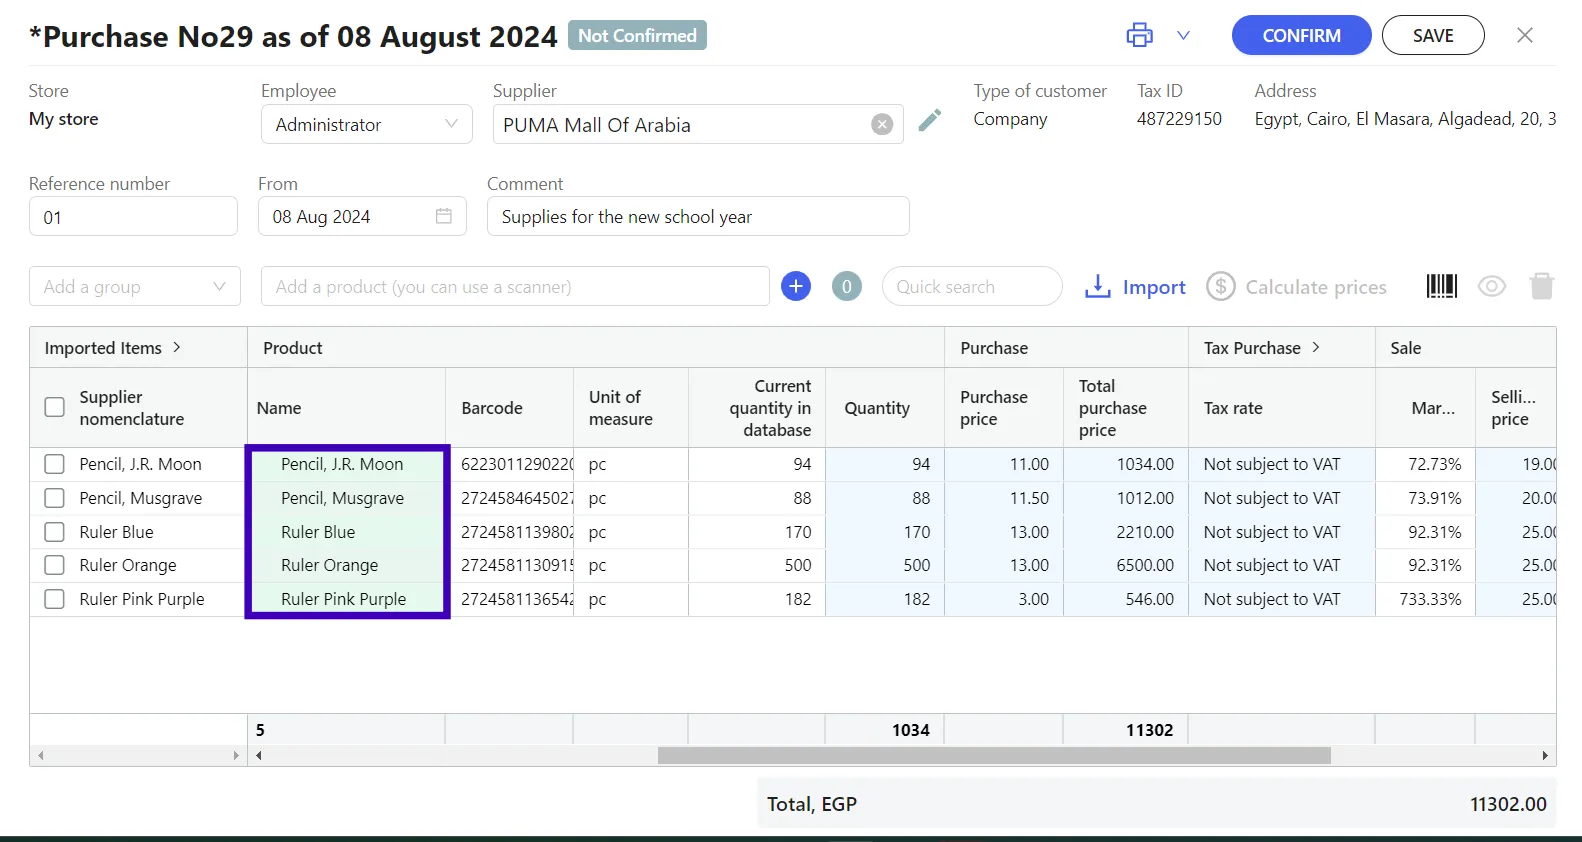
After uploading the supplier products data to the operation, ensure you fill out the right side of the table.
The right part can be completed manually (search or create in the line of the right part), as well as automatically, by matching items by Name and/or Article and/or Barcode.
It is possible to search by several keys. For example, the main part of the products to compare the Barcode, and the remaining by Name. It is also possible to create a whole group of new products, on the basis of the loaded data.
To automatically complete the rows on the right side, click Import, specify the matching key:
- Match by article;
- Match by barcode;
- Match by name.
and/or Create new products.
Quantity, Purchase price, Unit of measure, Selling price, and Total will be completed automatically, based on the uploaded file.
- After completing the right side, check the data. Make sure they match the supplier's document data. If necessary, you can make any adjustments: add or delete a row, correct the quantity, price, change the name in the products catalog or the unit of measure.
Please note! If products already exist in the database, only the following fields are updated during matching: Quantity, Purchase Price and Selling Price.
Saving an operation
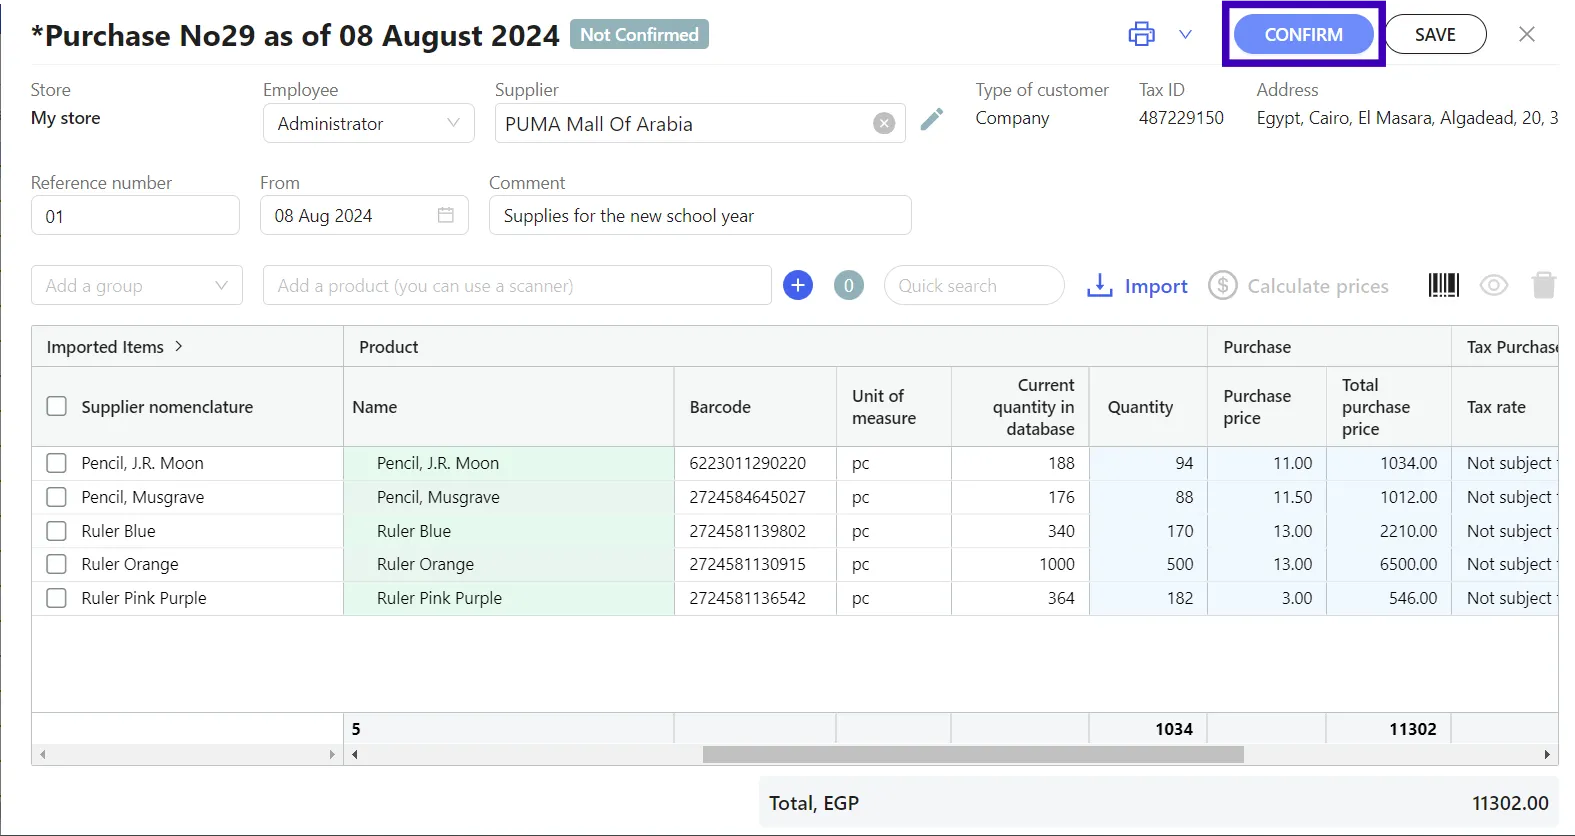
- After completing the tabular part, verify that the final quantity and purchase prices match the supplier's document. Verify that all fields in the operation are complete click Confirm.
The quantity, purchase price, and sale price data will update in the cloud after the operation is saved.
- If you haven't finished working on the operation yet, and you plan to return to it later, save the draft. To do this, click the Save button in the upper right corner of the header. You don't need to click Confirm.
- You can find a saved draft in the Operations tab → Inventory control. You can double-click to open the draft and continue working with it.
The difference between a draft and an executed operation is that there is no checkbox next to the draft operation in the Confirmed column.
When working with large operations, we recommend that you periodically save intermediate totals.
Please note! the operation cannot be edited once it has been executed.
Bulk recalculation of product prices
This conversion method allows you to calculate the selling price using arbitrary formulas for selected products.
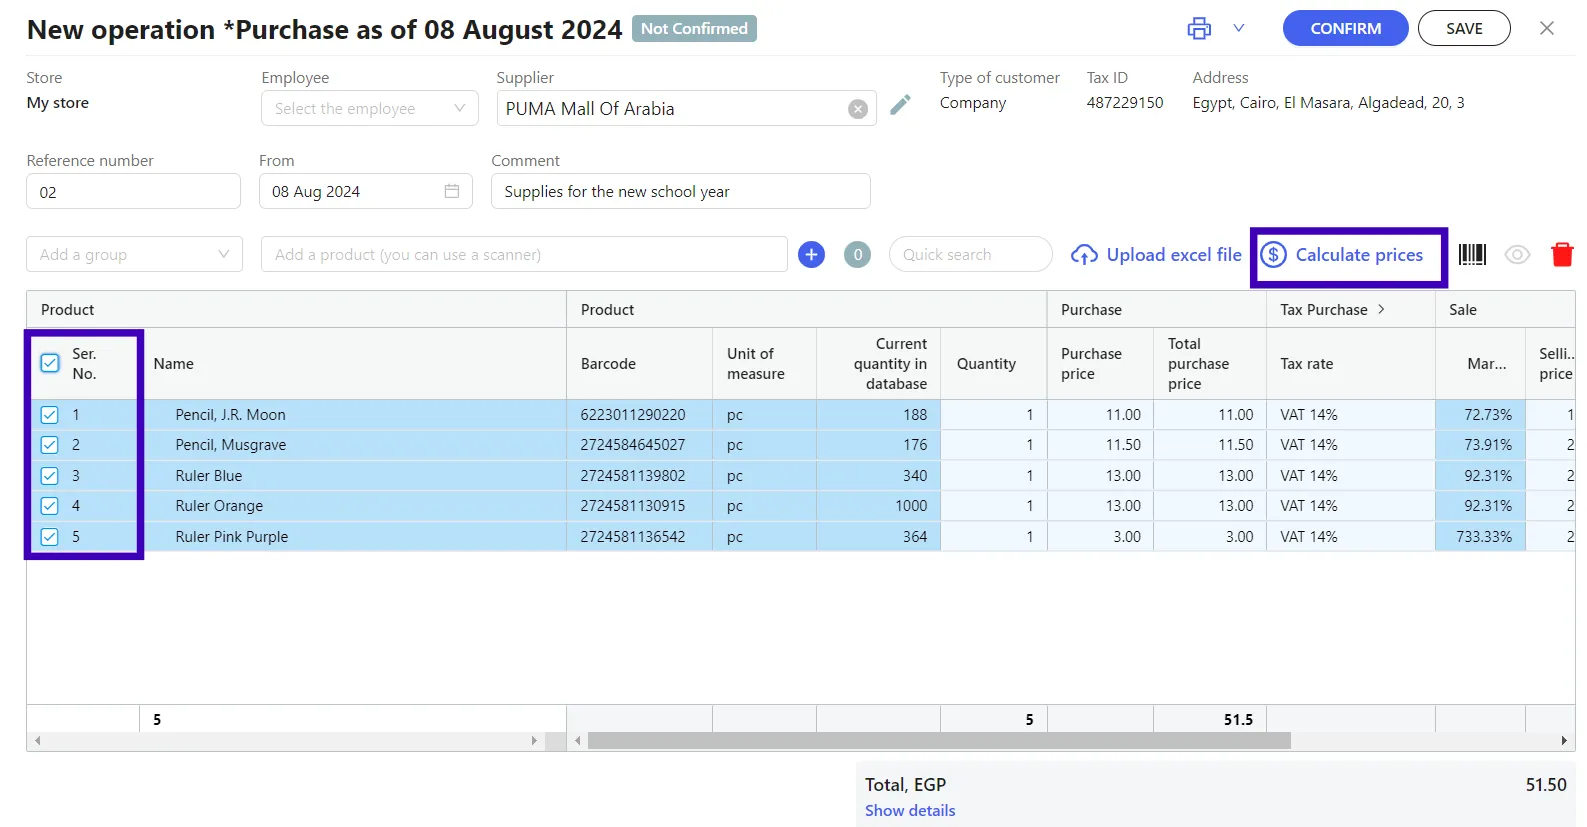
- For bulk recalculation of product prices, select the necessary items using the Group, Product selection and Quick search fields.
Select products in the generated operation:
- Select the checkbox (☑) in the operation header if you want to recalculate prices for all products in the operation with one formula;
- Select the checkboxes (☑) for the individual products to which you want to apply a single recalculation formula.
This option is suitable if, for example, for all sausage products you want to set one markup, and for frozen products - another.
- To choose the parameters for calculating new prices, click Calculate Prices.
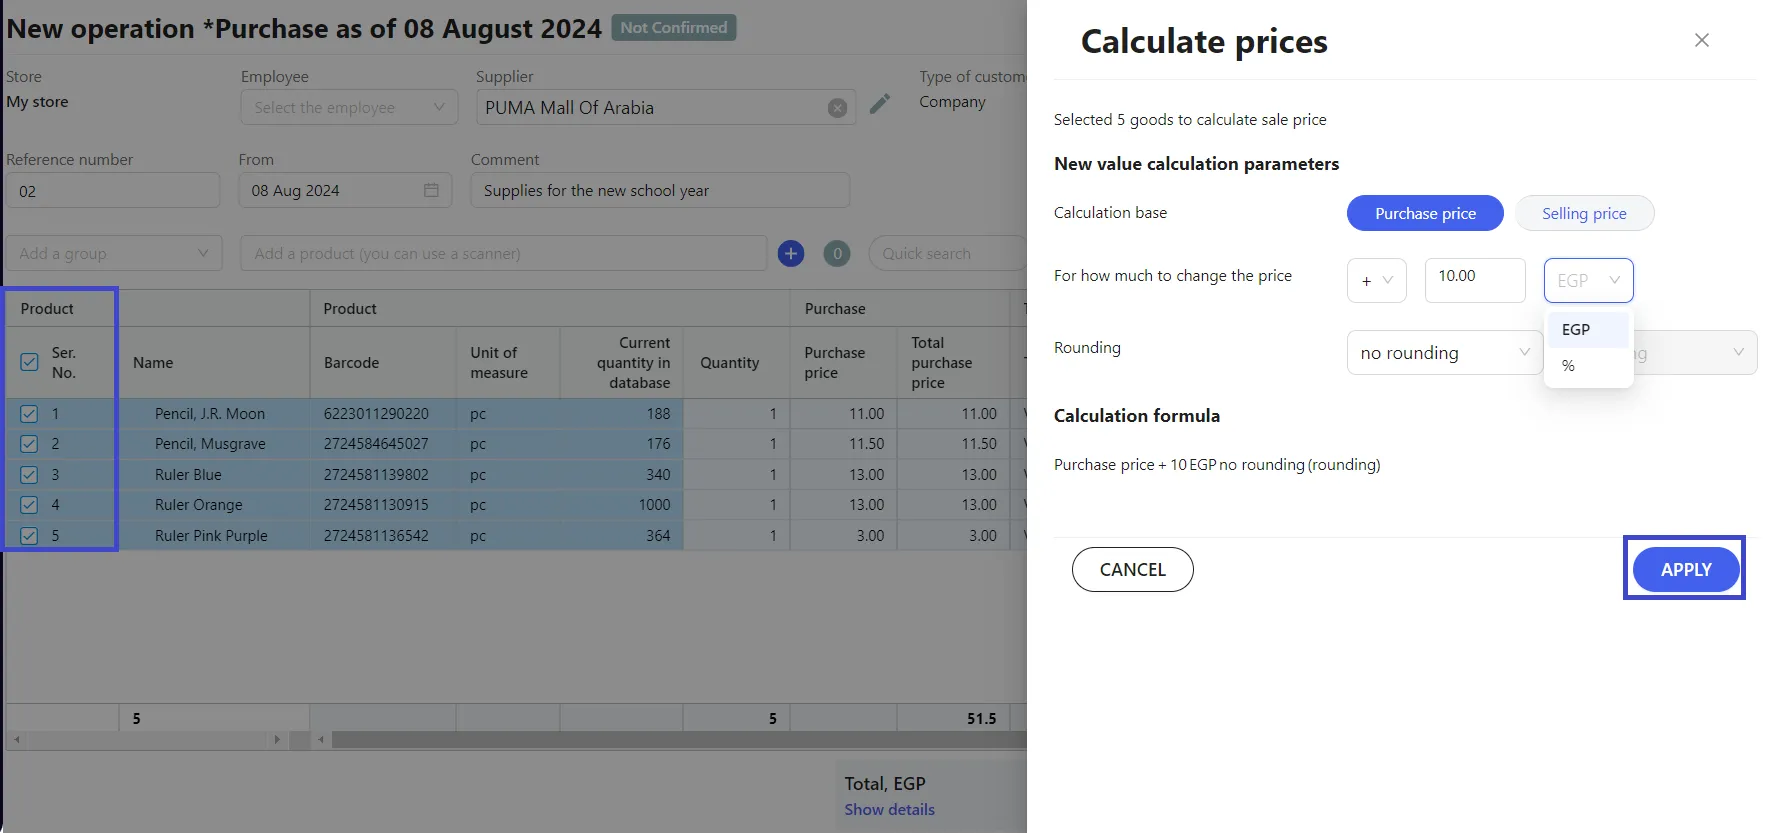
- Fill in all the fields in the modal window:
- Calculation base is the default Purchase Price.
- How much to change the base - in the first drop-down list select the mathematical action: "+", "-", "*", enter a positive numeric value in the field, in the second drop-down list - % value or EGP, units.
- Rounding. The default setting is Do not round.
If necessary, select one of the rounding options: for example, to piasters (up to 0.1) - easy to use during discounts and promotions for a more attractive price when discounting products, or to whole Egyptian Pound (up to 1, etc.) - if you want to remove plasters from prices, as well as for the convenience of cash transactions.
- Check the final calculation formula at the bottom of the modal window and click APPLY after completing all the fields.
The calculation results are displayed in the Selling price column, and the formula by which the new price is calculated is displayed in the Calculation Formula column.
The calculation formula shows which markup and rounding parameters were used for each item, which is especially useful in voluminous operations where several different markups were applied, for example, by product type.
You might also be interested in learning how to create purchase returns via your personal Pulsar account through the mobile app or the PULSAR POS device!

