Pulsar PSR logo
Features
Sales
Android POS Device Desktop POS Cloud Based POS Android POS Mobile App Bill Payment Card Acceptance P2P Payments
Business Process Automation
POS E-invoicing(Egypt Tax Authority) E-receipt(Egypt Tax Authority) Tecards, weighing goods Customer Display POS Software Kitchen Display Software Barcode Price Checker Software QR Menu SDK/API For Enterprise
Clients
Clients Relationship Management(CRM) Online Ordering-Delivery System Offers & Promotions
Management
Management Application(IOS, Android) (soon) Charts Analytics HRM (Soon) Loyalty Programs
Inventory
Suppliers & Purchases Inventory Management
Solutions
Retail
Grocery Store Online Store Supermarket Bakery Shop Eye wear shop Gift Shop Jewelry Store Furniture Store Clothes Shop Butcher Shop Perfume Store Tourists Products Shop
Food Service
Fast Food Restaurants Candy Shops Café & Restaurants Restaurants' Kitchen Food Delivery
Electronics
Mobile Shop Computer Shop Home Appliances
Medicine
Pharmacy Beauty Centers Laboratories Dentistry Doctors Clinics
Others
Cleaning Services Travel And Tourism Agencies Real Estate Agencies Training Centers Fitness & Gym Financial Services Air Conditioner Services Maintenance
Pricing Guides Blog Contacts
Call me
EGYPT
UAE
EN
AR
Features
Sales
Android POS Device Desktop POS Cloud Based POS Android POS Mobile App Bill Payment Card Acceptance P2P Payments
Business Process Automation
POS E-invoicing(Egypt Tax Authority) E-receipt(Egypt Tax Authority) Tecards, weighing goods Customer Display POS Software Kitchen Display Software Barcode Price Checker Software QR Menu SDK/API For Enterprise
Clients
Clients Relationship Management(CRM) Online Ordering-Delivery System Offers & Promotions
Management
Management Application(IOS, Android) (soon) Charts Analytics HRM (Soon) Loyalty Programs
Inventory
Suppliers & Purchases Inventory Management
Solutions
Retail
Grocery Store Online Store Supermarket Bakery Shop Eye wear shop Gift Shop Jewelry Store Furniture Store Clothes Shop Butcher Shop Perfume Store Tourists Products Shop
Food Service
Fast Food Restaurants Candy Shops Café & Restaurants Restaurants' Kitchen Food Delivery
Electronics
Mobile Shop Computer Shop Home Appliances
Medicine
Pharmacy Beauty Centers Laboratories Dentistry Doctors Clinics
Others
Cleaning Services Travel And Tourism Agencies Real Estate Agencies Training Centers Fitness & Gym Financial Services Air Conditioner Services Maintenance
Pricing Guides Blog Contacts
Call me
Log in
By using this site, you accept Cookies Policy
Accept
Help & Support Center
Inventory Control
Inventory of products in the store "Inventory Checking"
Getting started with Pulsar program and its features
How to start working with Pulsar?
Goods & Services
Create a new product
Editing а product
Deleting a product from the products catalog
Import and export products
Price tags and labels
Working with products groups
Configure the products catalog
Minimum quantity
Inventory Control
Record the products sale via Personal Account "Sale"
Record the sales returns via Personal Account "Sale Return"
Record the products acceptance "Purchase"
Returning purchased products to the supplier “Purchase Return”
Inventory of products in the store "Inventory Checking"
Accounting write-off of products “Write-Off”
Move the products between stores "Transfer"
Assembling the products into a set "Assemble"
Disassembling a product set intngo sile items "Disassemble"
Change the products retail prices "Revaluation"
Catering & Production
Product components card
The Produce Operation
Recalculation of the dish's purchase price
Reports & Analytics
Product Movement Report
Clients / Suppliers Balance report
The Inclusive Tax Report
Expiration Period Report
Analytics in the product card
The Online Store
Online Store Creation
CRM/SRM/Customers & Suppliers
Creating a customer or a supplier card
Payments: Exploring customers & suppliers payments
Settlements with customers & suppliers
Integration with ETA to submit the e-invoices & e-receipts
E-invoices & E-receipts exchange with ETA
Fill in the organization’s information
Prepare to send the electronic invoices (e-invoices)
Send the electronic invoice (e-invoice) to ETA
Prepare to send the electronic receipts (e-receipts)
Send the electronic receipt (e-receipt) to ETA
CashReg cashier software and its features from A to Z
What is a CashReg program ?
Initial connection to work with the cashier software CashReg
Getting started with the cashier software CashReg
Install the cashier software CashReg
Connect a scale for products that need to be weighed
Sales settings for the cashier software CashReg
Device settings to work with the cashier software CashReg
Sales rules settings in the cashier software CashReg
Point of sale (shop) settings
Employees settings
Operations in the CashReg program
Open the shift in the cashier software CashReg
Add a product to the products catalog
Record the sales in the cashier software CashReg
Record the sales returns in the cashier software CashReg
Deferred receipt in the cashier software CashReg
Closing shift (Z report)
Reminder about working with the CashReg program
PULSAR POS-Device
Adding new goods & services on the Pulsar POS device
Purchase goods & services "Goods Acceptance" by the Pulsar POS device
Sale goods and services "Sale" by the Pulsar POS device
Record the goods & services returns by the Pulsar POS device
Products write-off on the Pulsar POS device
Return purchased goods to suppliers by the Pulsar POS device
Conducting inventory of products by the Pulsar POS device
Purchasing & changing retail prices by the Pulsar POS device
products POS point of sale Inventory checking

Inventory of products in the store "Inventory Checking"

Inventory Checking is the only way to reflect actual remains in the accounting records, not estimated ones. Regular account audits help to stop theft and dishonest work of employees.

Inventory allows you not only to detect shortages, but also to correct over-all items in the accounts, arising as a result of cashier's mistakes.

In the web version you can perform an inventory of the entire retail store, as well as a sample group of products or single items. Missing items in the operation will not be affected.

Also, you can do the inventory in the mobile version & Pulsar POS device. .

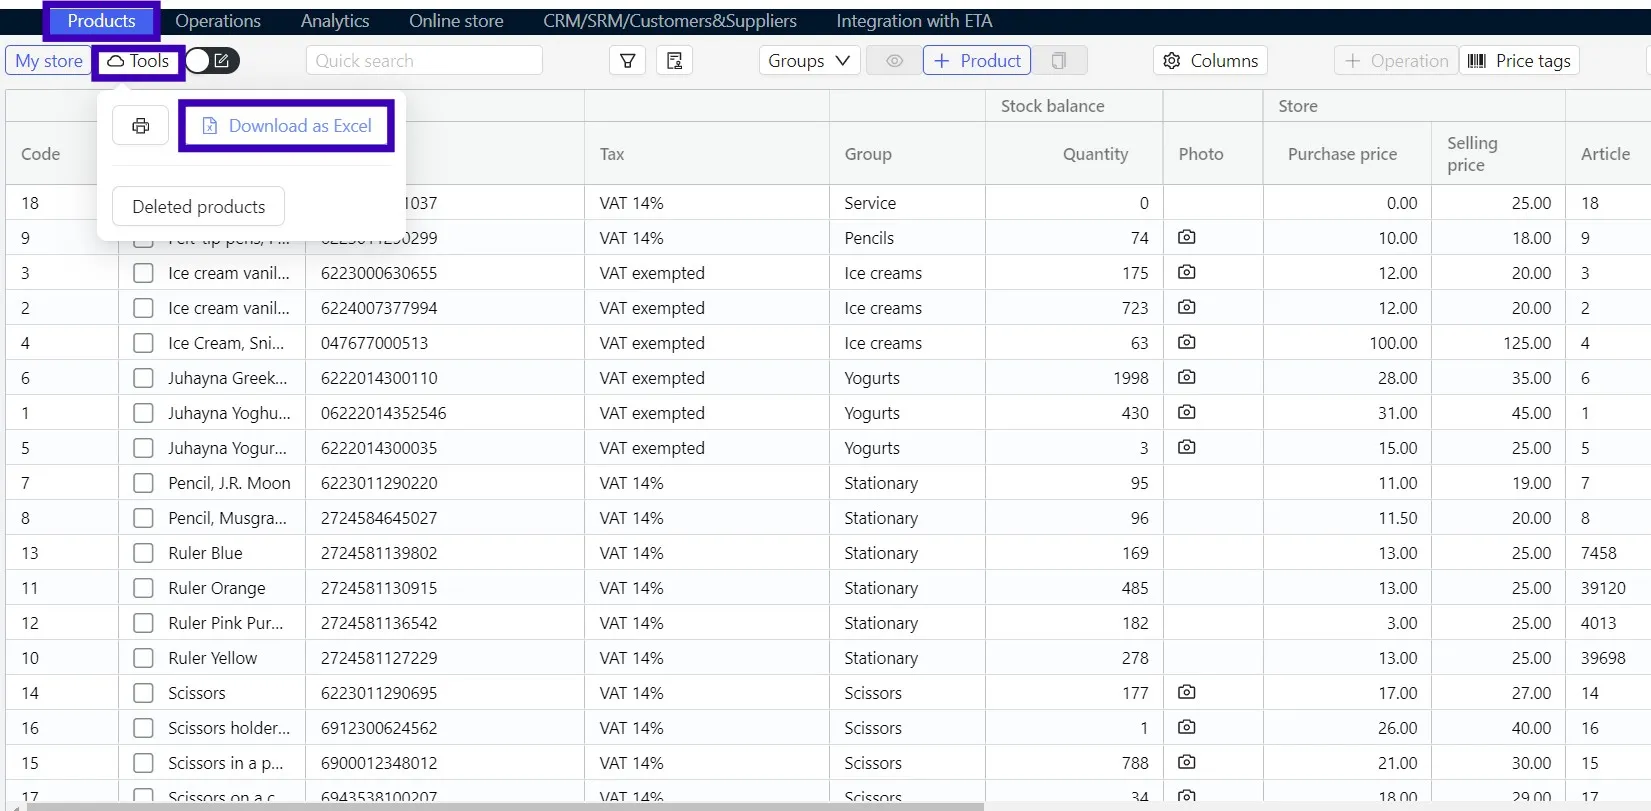
Before you start the inventory, recommended making a backup download database in Excel where quick download button is available directly in the application.

If possible, do not take any inventory counts during your point of sale (store) hours. To avoid mistakes, it is better to recalculate outside of your point of sale (store) hours, not during peak customers activity hours or by stopping sales of selected products groups/departments of the your point of sale (store).

Creating the operation

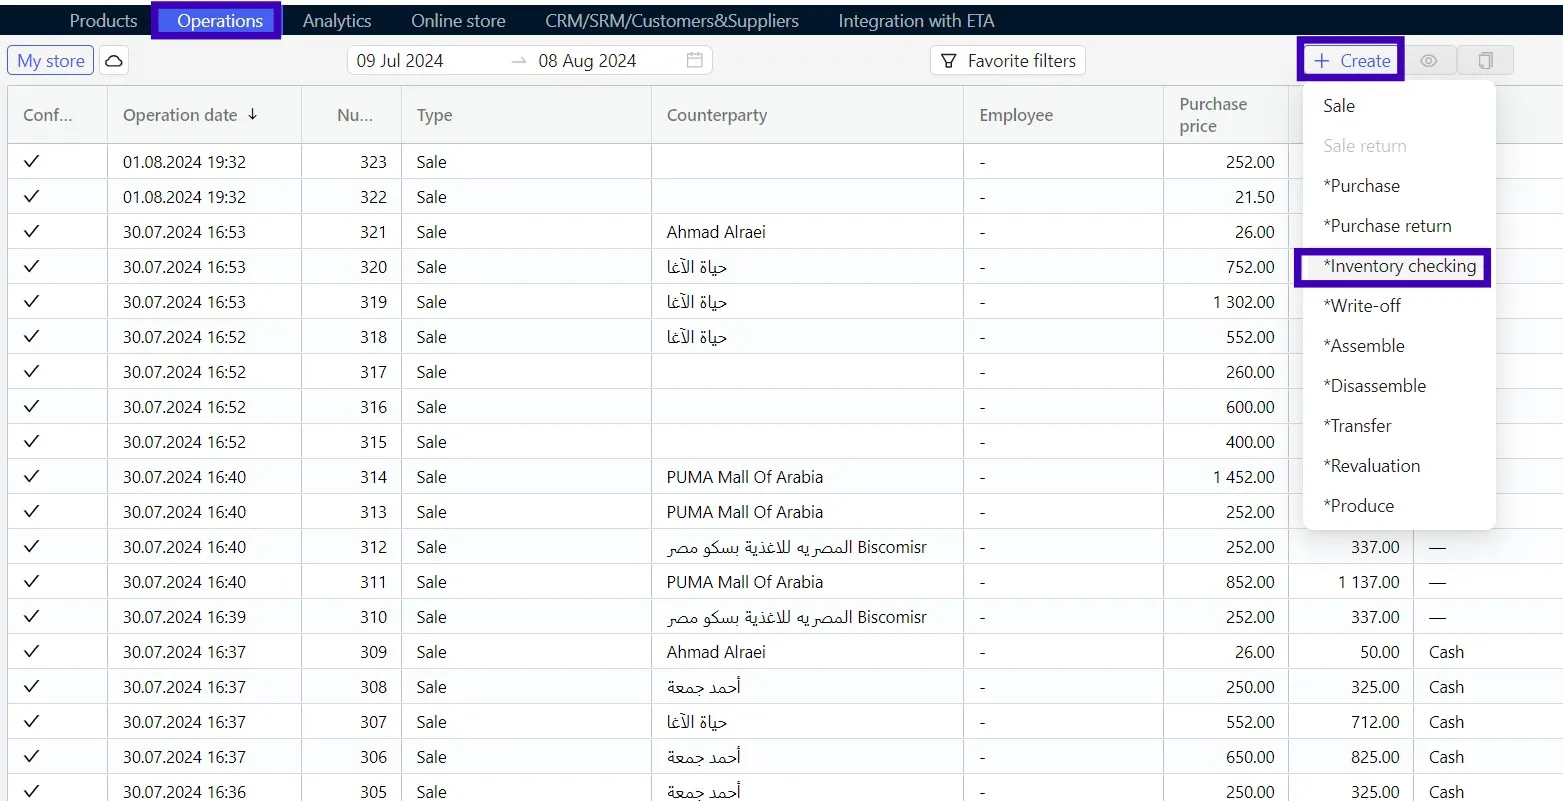
Go to the Operations → Inventory control tab. In the upper left corner, select the point of sale (store) where you want to create the operation. Then click + Create in the upper menu and select the operation Inventory checking.

2

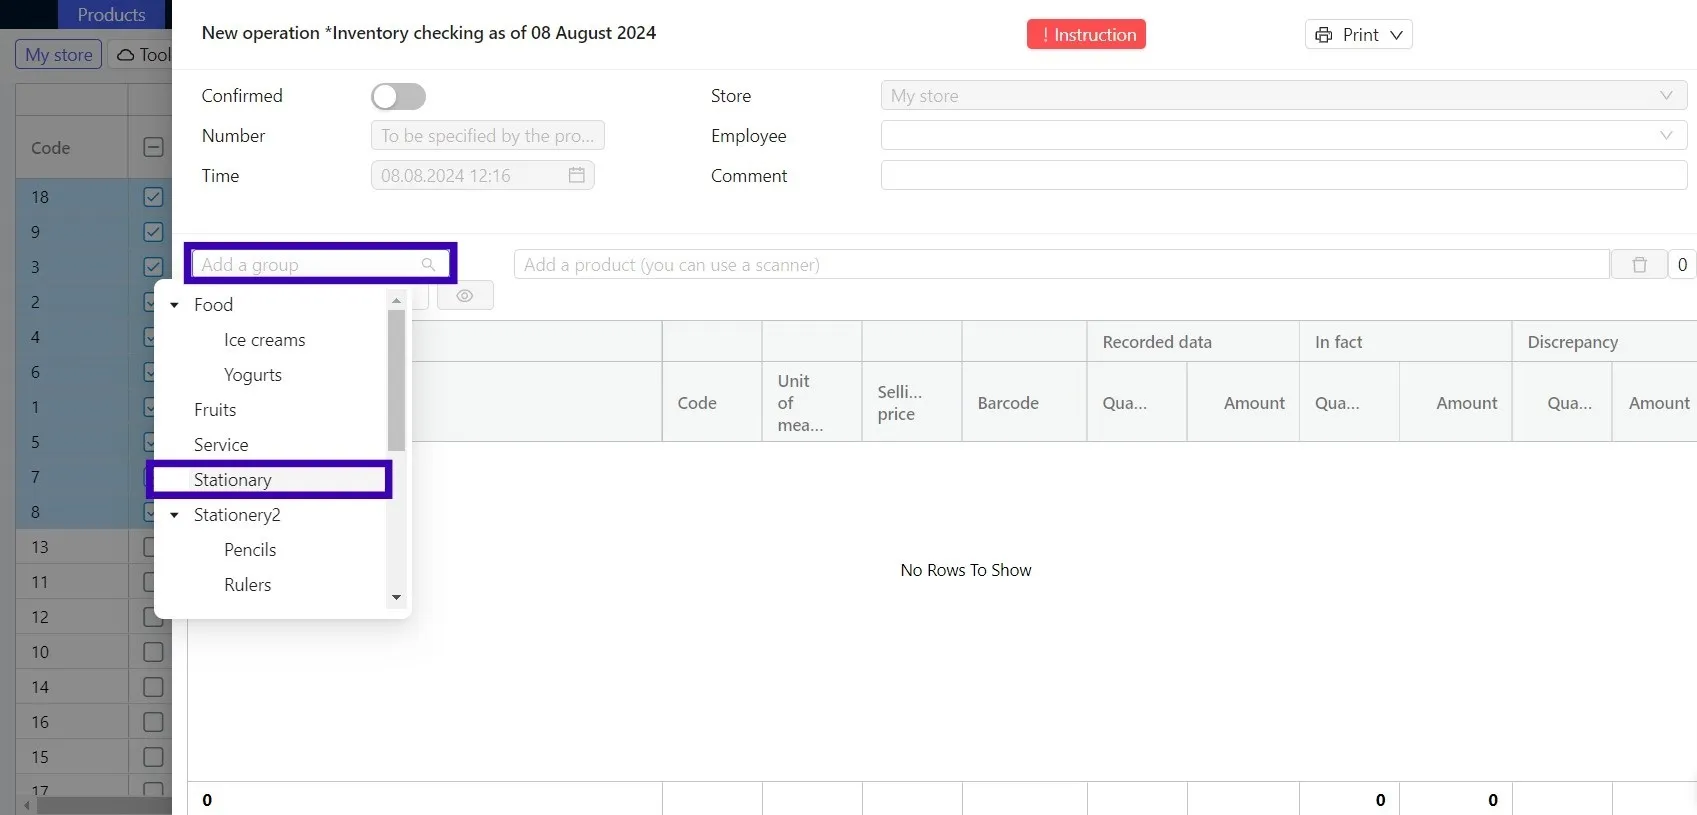
In the header of the opened operation, complete the fields Employee and Comment. The operation number and date are generated automatically. All operations are created only with the current date.

Inventory checking can be created from the Products or also from Operations tabs. In order to create a operation on the Products tab:

  • Select one or more products that you want to inventory. If you want to select all products - check the Name box in the column header.
    • For easy groups of products selection, use filters or group selection.
  • Press +Operation on the top menu.
  • Select Inventory checking from the drop-down list.
3

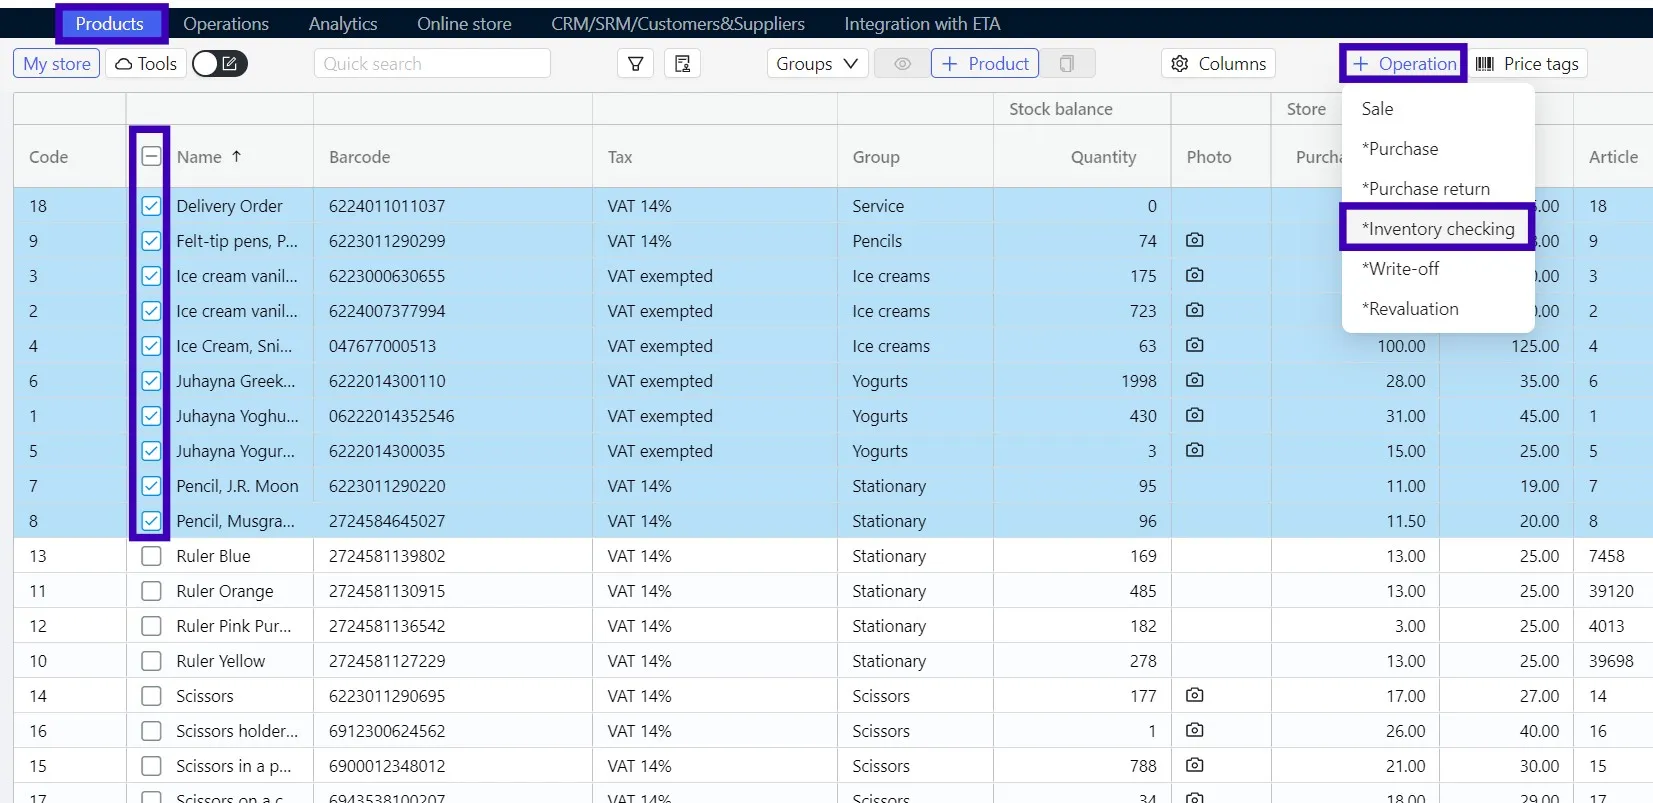
The selected products will be added to the table part of the operation.

Completing the tabular part

The Recalculation can be done in two ways. will discuss both:

  1. First, complete the statement with the list of products that you want to recalculate. This can be done manually by clicking on the cursor on the line of the selected product, or by scanning or selecting the desired products group from the drop-down list.
4

Clearing actual values is available for the entire statement by clicking on the "0" icon in the operation header. Print the statement and save a draft of the created Inventory checking operation (click Save). Recalculate products in the point of sale (store) and enter the fact quantity in the paper document. Then transfer the actual quantity of products to the saved draft operation.

5

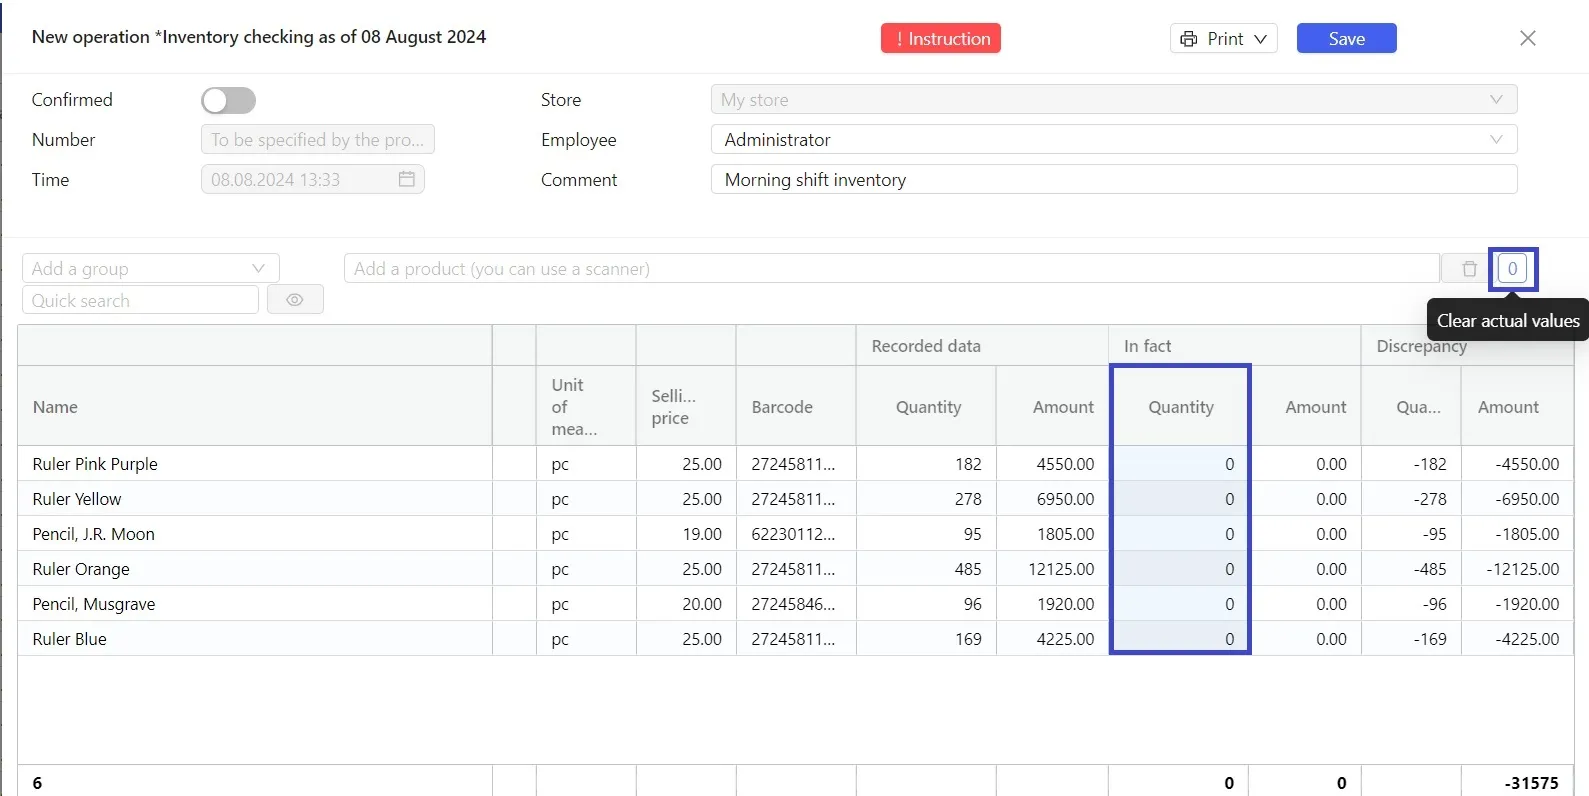
2. Immediately enter the actual remains in the Inventory checking operation in the application. This is especially useful if you're recalculating with a scanner. Each scan of one item will add +1 to the In fact column. Scanning the Alenka chocolate barcode four times in the operation will reflect "4" in In fact column. Can be combined with the manual entry of remains.

Use the Quick Search bar at the top of the table to easily search for an item on the worksheet. The search can be done either by scanner or by manually entering the name or barcode. If there is an unnecessary item in the statement, highlight the line with such an item and click the recycle bin icon in the operation header.

Saving the operation

When working with the operation, don't forget to periodically save a draft by clicking Save in the top menu of the operation. By double-clicking, you can open the draft from the operation register and continue working with it. When working with large operations, we recommend periodically saving temporary results. After entering all remains, make sure that there are no items with an empty actual quantity left in the statement.

  • If after recalculation there are products with an empty quantity, and they are really absent at the time of recalculation - put 0 in the column In fact;
  • If you missed them in the recalculation, but in fact they are in the store - recalculate such a product and enter a fact quantity for it.

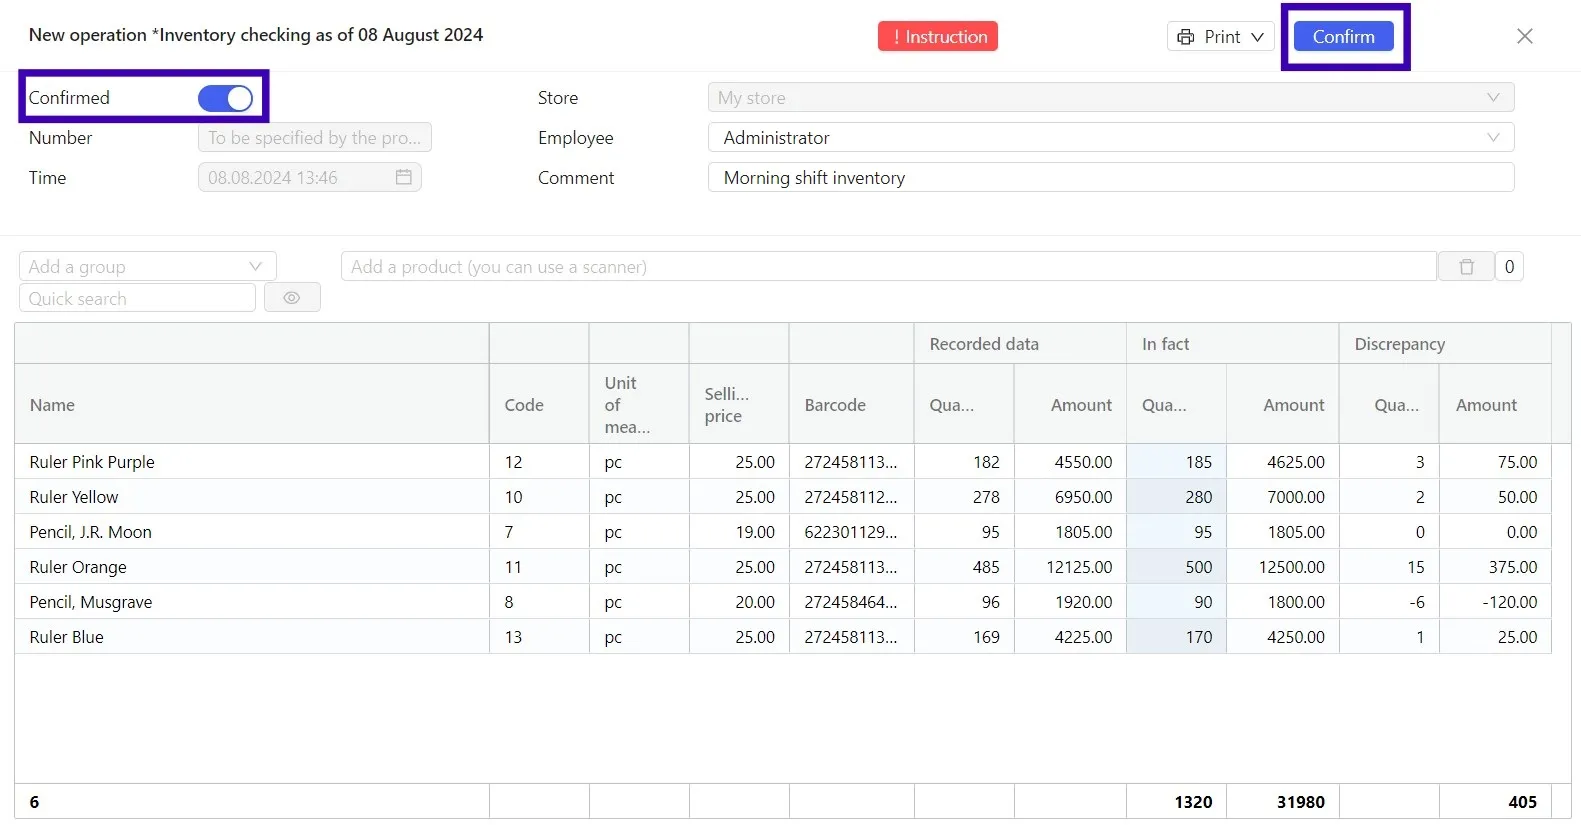
After completing the tabular part, make sure that all the fields of the operation are completed, then activate the Confirmed slider in the upper left corner of the operation header and click Confirm.

Please note! Once an operation is reflected in the accounts section, you cannot edit it. If you find an error after reflecting the operation in the accounts section, create one more Inventory checking operation and enter the correct fact quantity for the product, where the error occurred.

6

Information about quantities of the remaining products will be updated in the application as soon as the operation is saved.

If you haven't finished working on the operation yet, and you plan to return to it later, save it as a draft. To do this, click the Save button in the upper right corner of the header. You don't need to activate the Confirmed slider in this case.

7

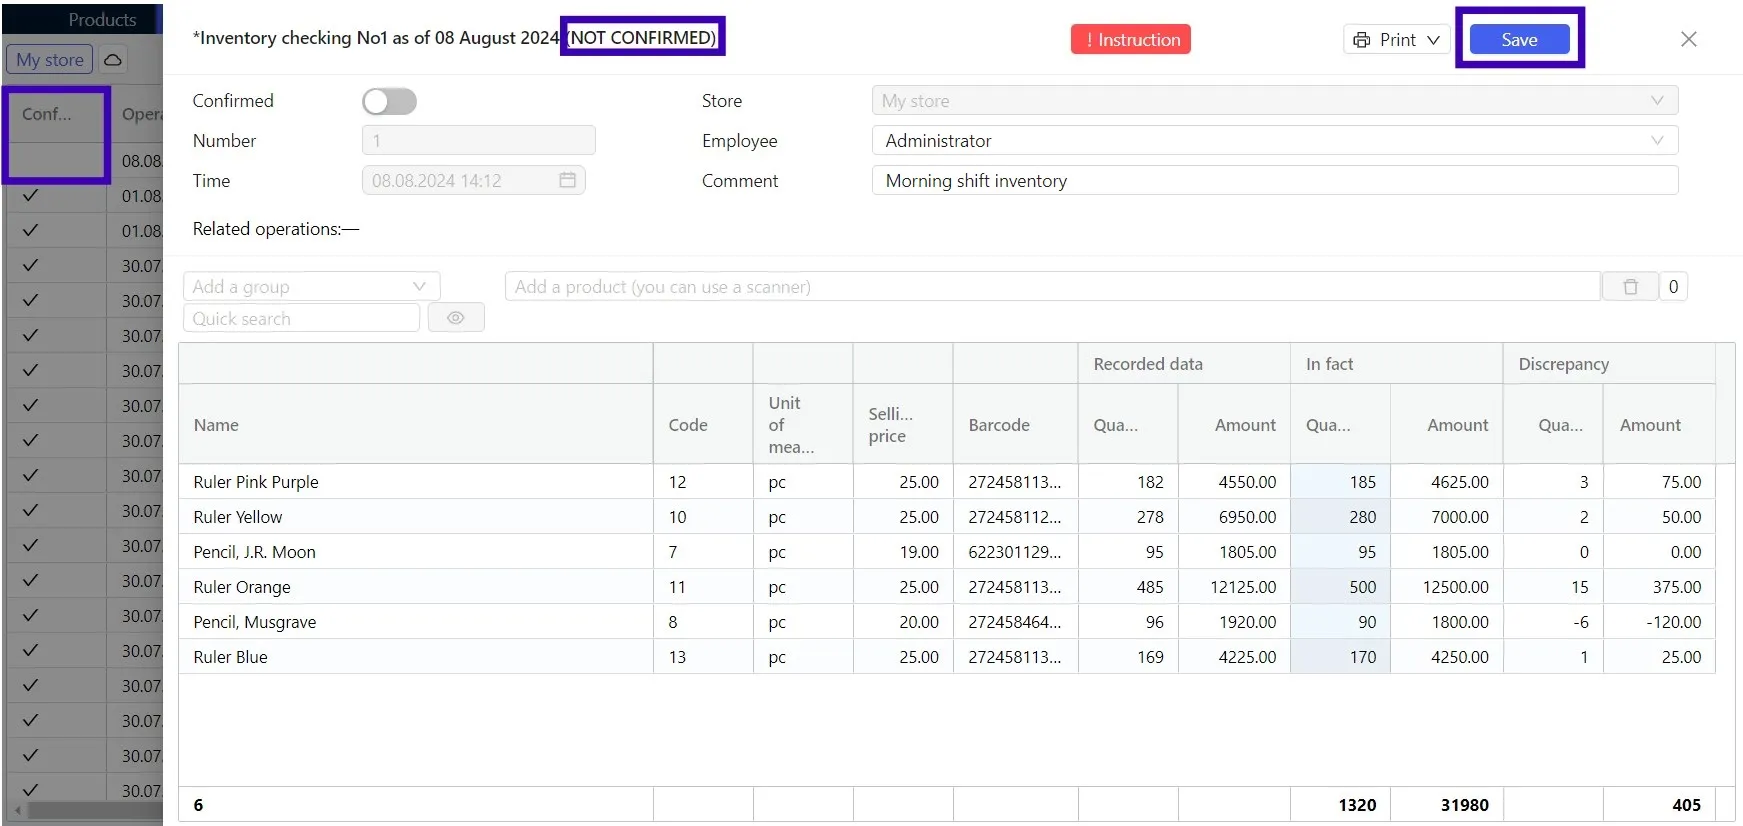
You can find the saved draft in the Operations → Inventory control. Double-click to open the draft and continue working with it.

The difference between a draft and an executed operation is that there is no checkbox next to the draft operation in the Confirmed column.

Please note! the operation cannot be edited once it has been executed.

In the article
Creating the operation Completing the tabular part Saving the operation
Pulsar PSR логотип
info@psr.com.eg
Resources
Guides Blog License Agreement
Company
About PSR Contact Careers
info@psr.com.eg Privacy Policy
Privacy Policy
© Pulsar for Information technology L.L.C, 2023

All details will be sent to
you via email

By sending your details you agree to the privacy policy

Сall you back

Enter your phone number and we will call you back
By sending your details you agree to the privacy policy
Your request has been
submitted successfully