Pulsar PSR logo
Features
Sales
Android POS Device Desktop POS Cloud Based POS Android POS Mobile App Bill Payment Card Acceptance P2P Payments
Business Process Automation
POS E-invoicing(Egypt Tax Authority) E-receipt(Egypt Tax Authority) Tecards, weighing goods Customer Display POS Software Kitchen Display Software Barcode Price Checker Software QR Menu SDK/API For Enterprise
Clients
Clients Relationship Management(CRM) Online Ordering-Delivery System Offers & Promotions
Management
Management Application(IOS, Android) (soon) Charts Analytics HRM (Soon) Loyalty Programs
Inventory
Suppliers & Purchases Inventory Management
Solutions
Retail
Grocery Store Online Store Supermarket Bakery Shop Eye wear shop Gift Shop Jewelry Store Furniture Store Clothes Shop Butcher Shop Perfume Store Tourists Products Shop
Food Service
Fast Food Restaurants Candy Shops Café & Restaurants Restaurants' Kitchen Food Delivery
Electronics
Mobile Shop Computer Shop Home Appliances
Medicine
Pharmacy Beauty Centers Laboratories Dentistry Doctors Clinics
Others
Cleaning Services Travel And Tourism Agencies Real Estate Agencies Training Centers Fitness & Gym Financial Services Air Conditioner Services Maintenance
Pricing Guides Blog Contacts
Call me
EGYPT
UAE
EN
AR
Features
Sales
Android POS Device Desktop POS Cloud Based POS Android POS Mobile App Bill Payment Card Acceptance P2P Payments
Business Process Automation
POS E-invoicing(Egypt Tax Authority) E-receipt(Egypt Tax Authority) Tecards, weighing goods Customer Display POS Software Kitchen Display Software Barcode Price Checker Software QR Menu SDK/API For Enterprise
Clients
Clients Relationship Management(CRM) Online Ordering-Delivery System Offers & Promotions
Management
Management Application(IOS, Android) (soon) Charts Analytics HRM (Soon) Loyalty Programs
Inventory
Suppliers & Purchases Inventory Management
Solutions
Retail
Grocery Store Online Store Supermarket Bakery Shop Eye wear shop Gift Shop Jewelry Store Furniture Store Clothes Shop Butcher Shop Perfume Store Tourists Products Shop
Food Service
Fast Food Restaurants Candy Shops Café & Restaurants Restaurants' Kitchen Food Delivery
Electronics
Mobile Shop Computer Shop Home Appliances
Medicine
Pharmacy Beauty Centers Laboratories Dentistry Doctors Clinics
Others
Cleaning Services Travel And Tourism Agencies Real Estate Agencies Training Centers Fitness & Gym Financial Services Air Conditioner Services Maintenance
Pricing Guides Blog Contacts
Call me
Log in
By using this site, you accept Cookies Policy
Accept
Help & Support Center
Inventory Control
Move the products between stores "Transfer"
Getting started with Pulsar program and its features
How to start working with Pulsar?
Goods & Services
Create a new product
Editing а product
Deleting a product from the products catalog
Import and export products
Price tags and labels
Working with products groups
Configure the products catalog
Minimum quantity
Inventory Control
Record the products sale via Personal Account "Sale"
Record the sales returns via Personal Account "Sale Return"
Record the products acceptance "Purchase"
Returning purchased products to the supplier “Purchase Return”
Inventory of products in the store "Inventory Checking"
Accounting write-off of products “Write-Off”
Move the products between stores "Transfer"
Assembling the products into a set "Assemble"
Disassembling a product set intngo sile items "Disassemble"
Change the products retail prices "Revaluation"
Catering & Production
Product components card
The Produce Operation
Recalculation of the dish's purchase price
Reports & Analytics
Product Movement Report
Clients / Suppliers Balance report
The Inclusive Tax Report
Expiration Period Report
Analytics in the product card
The Online Store
Online Store Creation
CRM/SRM/Customers & Suppliers
Creating a customer or a supplier card
Payments: Exploring customers & suppliers payments
Settlements with customers & suppliers
Integration with ETA to submit the e-invoices & e-receipts
E-invoices & E-receipts exchange with ETA
Fill in the organization’s information
Prepare to send the electronic invoices (e-invoices)
Send the electronic invoice (e-invoice) to ETA
Prepare to send the electronic receipts (e-receipts)
Send the electronic receipt (e-receipt) to ETA
CashReg cashier software and its features from A to Z
What is a CashReg program ?
Initial connection to work with the cashier software CashReg
Getting started with the cashier software CashReg
Install the cashier software CashReg
Connect a scale for products that need to be weighed
Sales settings for the cashier software CashReg
Device settings to work with the cashier software CashReg
Sales rules settings in the cashier software CashReg
Point of sale (shop) settings
Employees settings
Operations in the CashReg program
Open the shift in the cashier software CashReg
Add a product to the products catalog
Record the sales in the cashier software CashReg
Record the sales returns in the cashier software CashReg
Deferred receipt in the cashier software CashReg
Closing shift (Z report)
Reminder about working with the CashReg program
PULSAR POS-Device
Adding new goods & services on the Pulsar POS device
Purchase goods & services "Goods Acceptance" by the Pulsar POS device
Sale goods and services "Sale" by the Pulsar POS device
Record the goods & services returns by the Pulsar POS device
Products write-off on the Pulsar POS device
Return purchased goods to suppliers by the Pulsar POS device
Conducting inventory of products by the Pulsar POS device
Purchasing & changing retail prices by the Pulsar POS device
products point of sale

Move the products between stores "Transfer"

To move products from the one your point of sale (store) to another one, use the Transfer operation.

After executing the operation, the transferred products
will be written-off from the consignor point of sale (sending store) and recorded at the consignee point of sale (receiving store).

Creation Operation

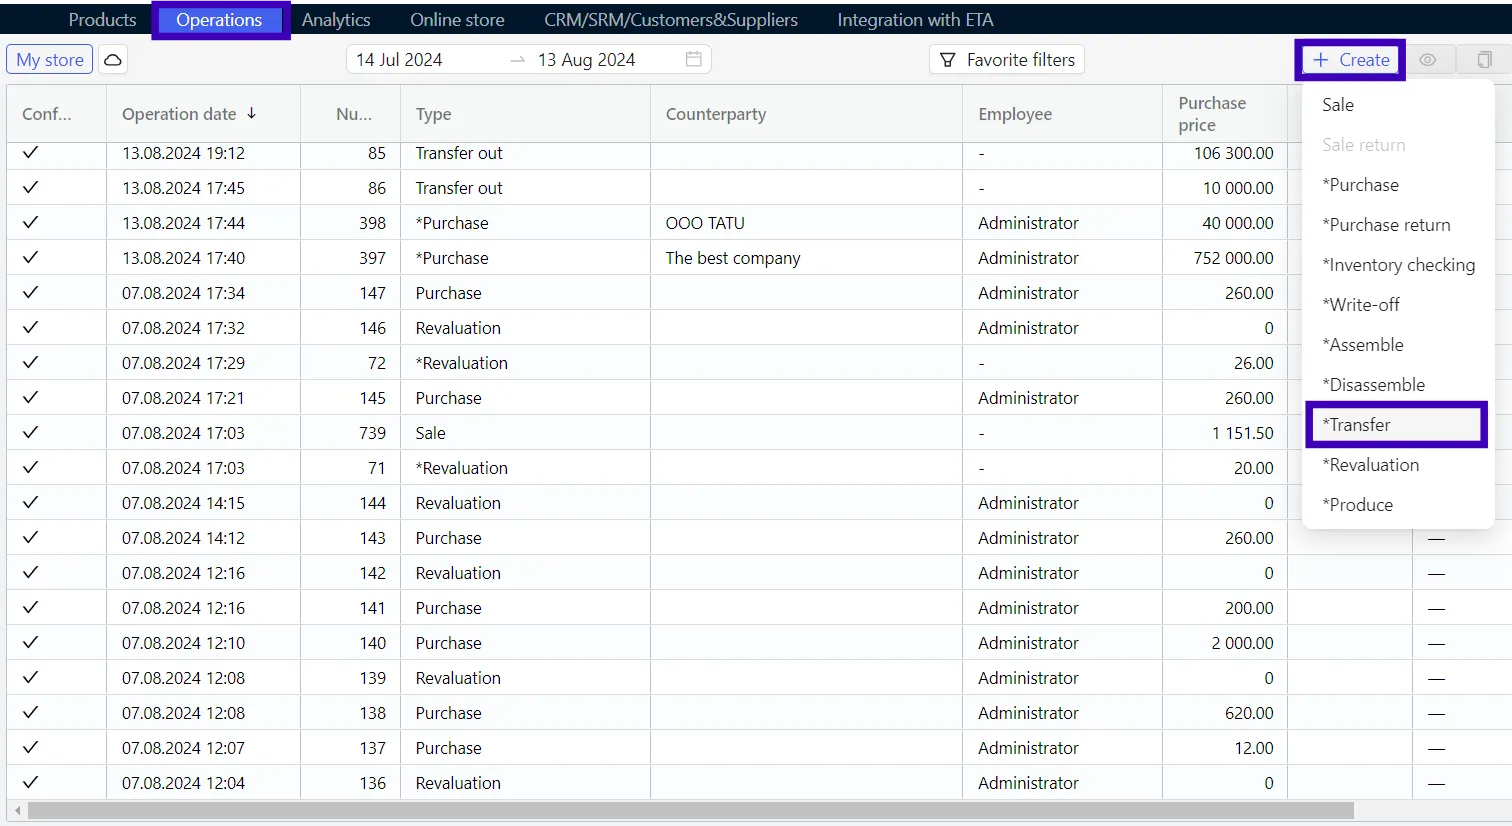
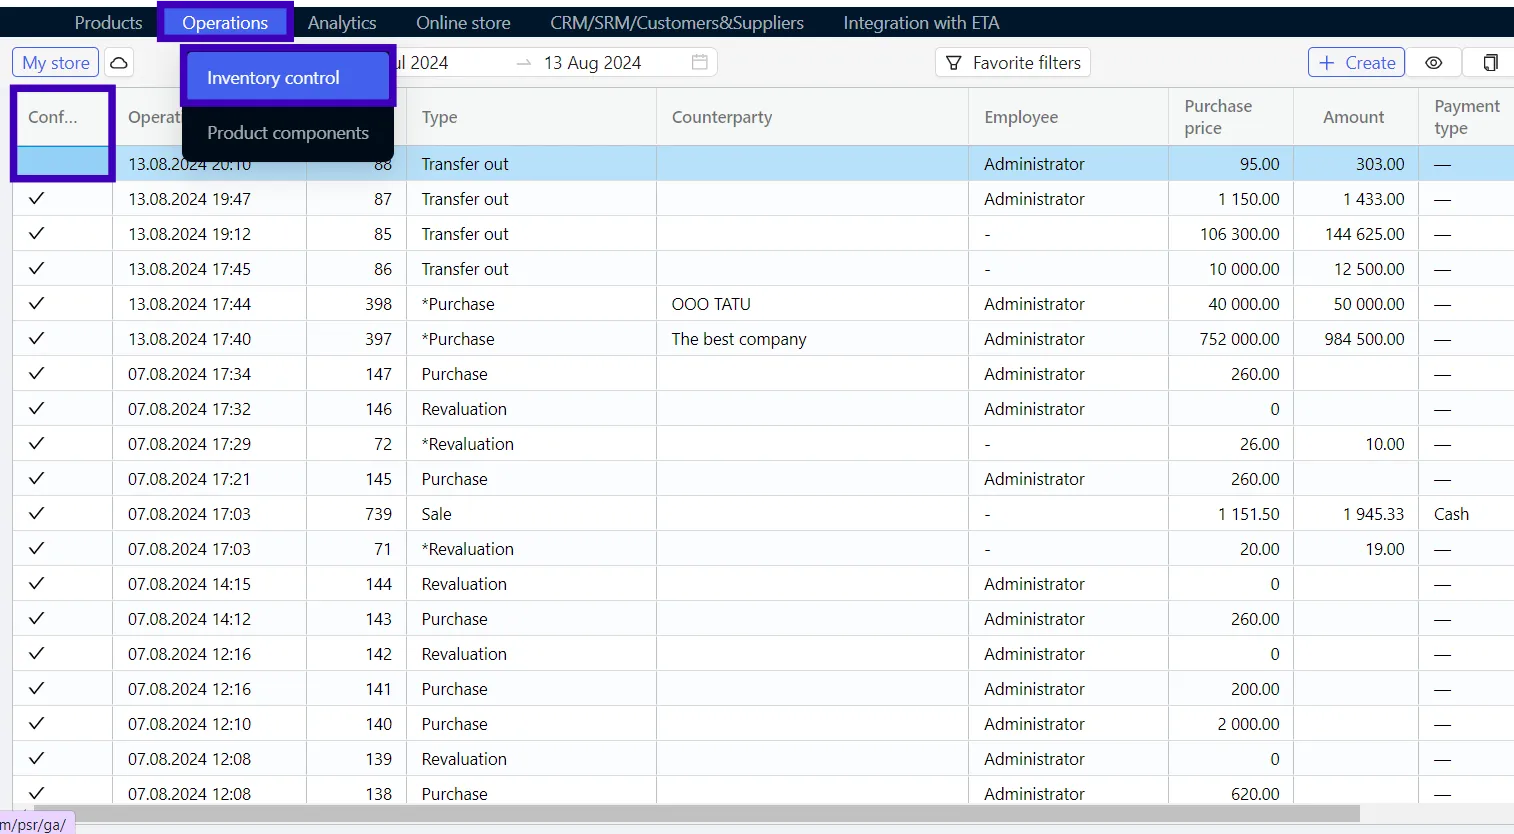
  • Go to the following tab: Operations → Inventory control. Click + Create in the control menu and select the Transfer operation.
1

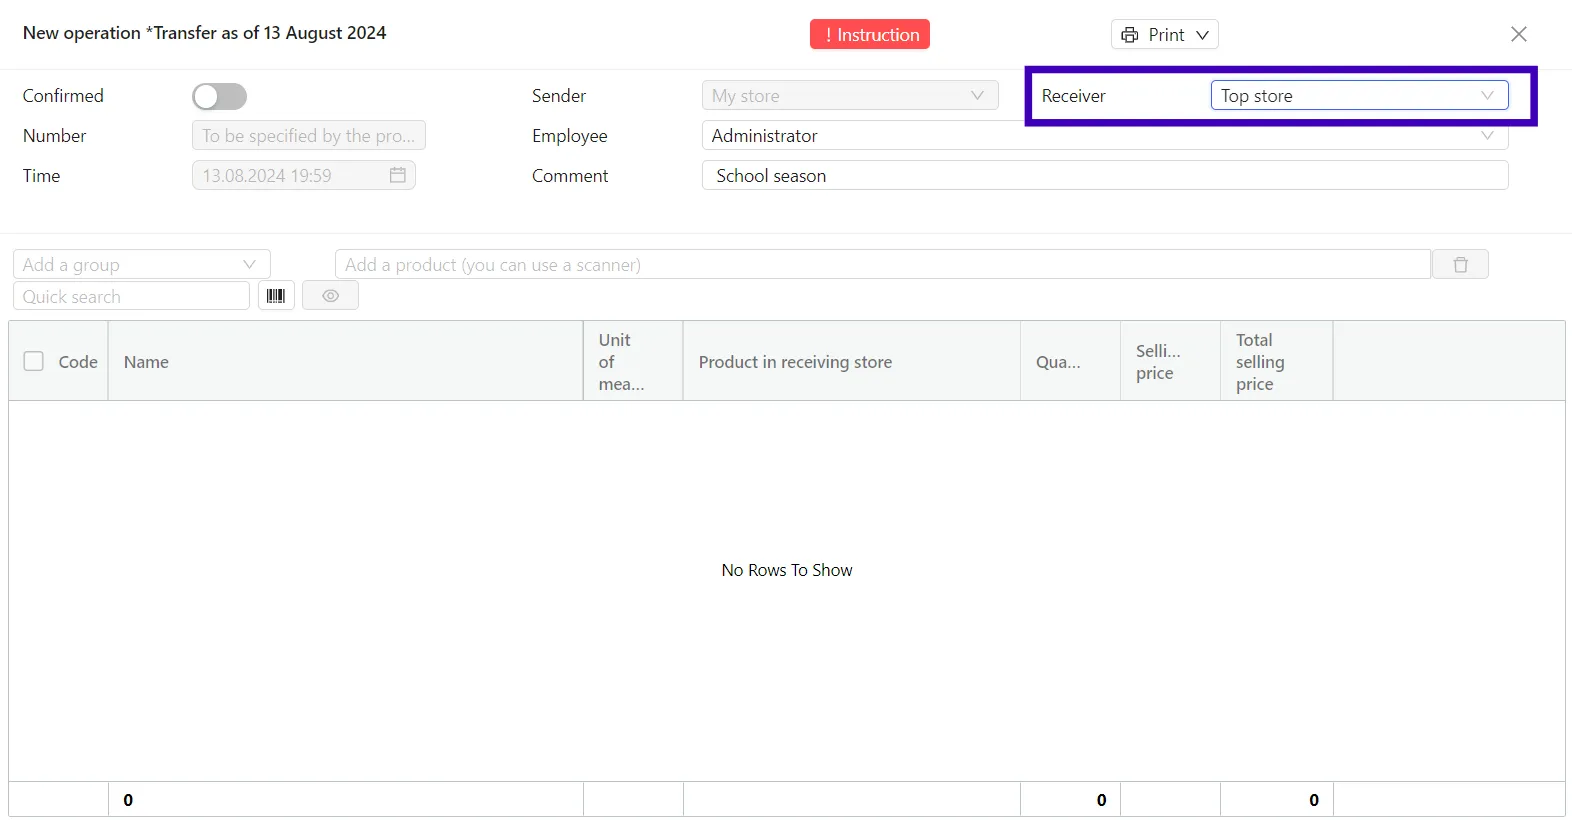
  • Fill in the Employee and Comment fields in the operation header if you wish. The number and date of the operation are generated automatically.
  • Specify which your receiving point of sale (receiving store) you plan to move to in the Receiver field.
2

Filling in the tabular part

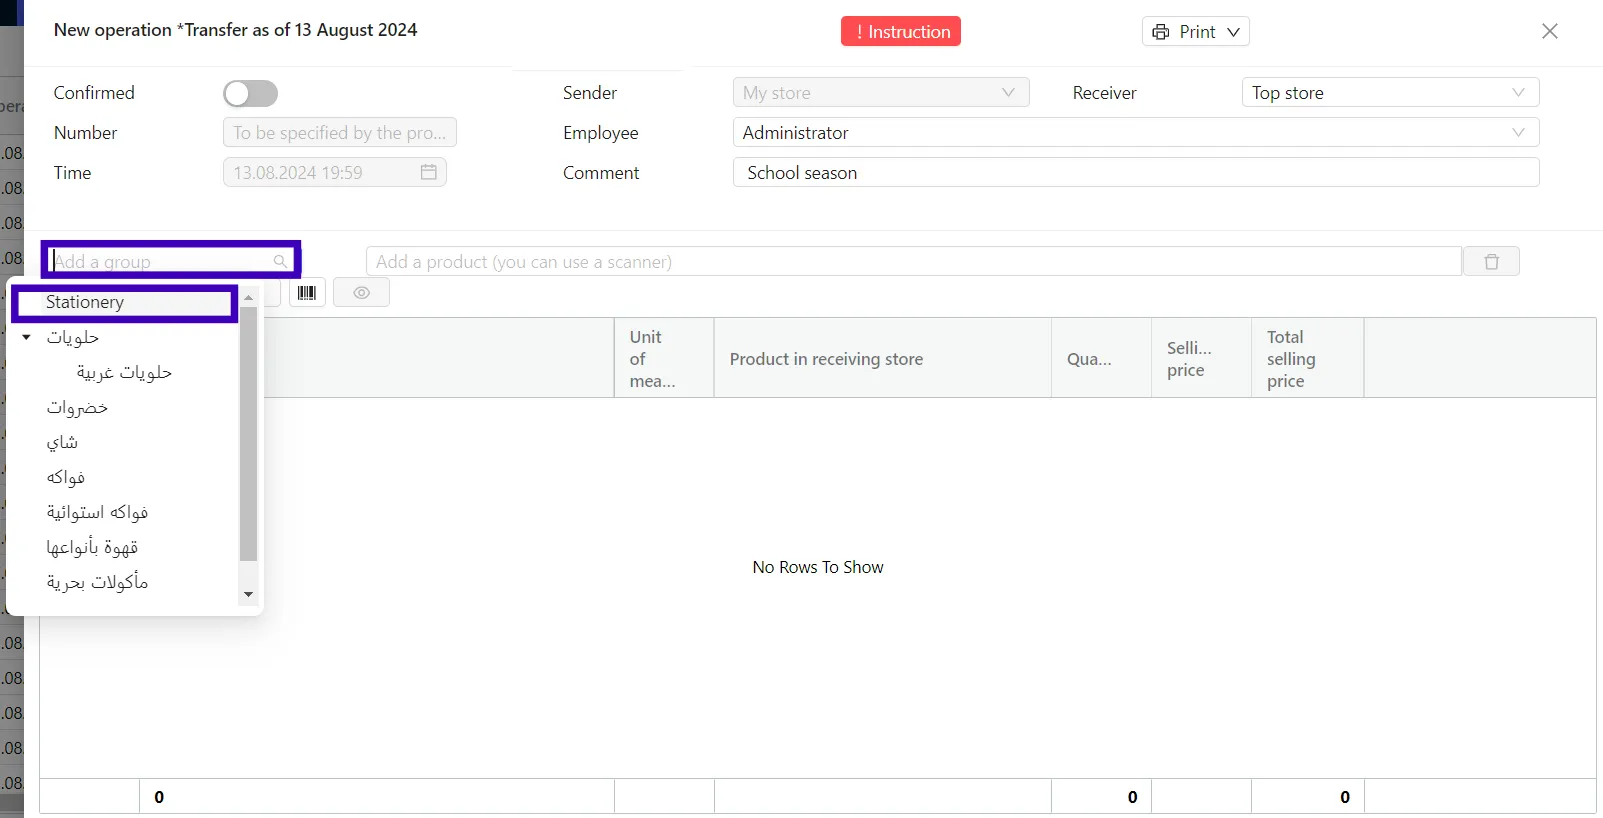
  • In the selection line, specify the products that will be moved from the sending point of sale (sending store).
  • If you need to move the whole products group, select it in the drop-down list to the left from the selection line – the operation will be automatically filled in with all products from the selected group.
3

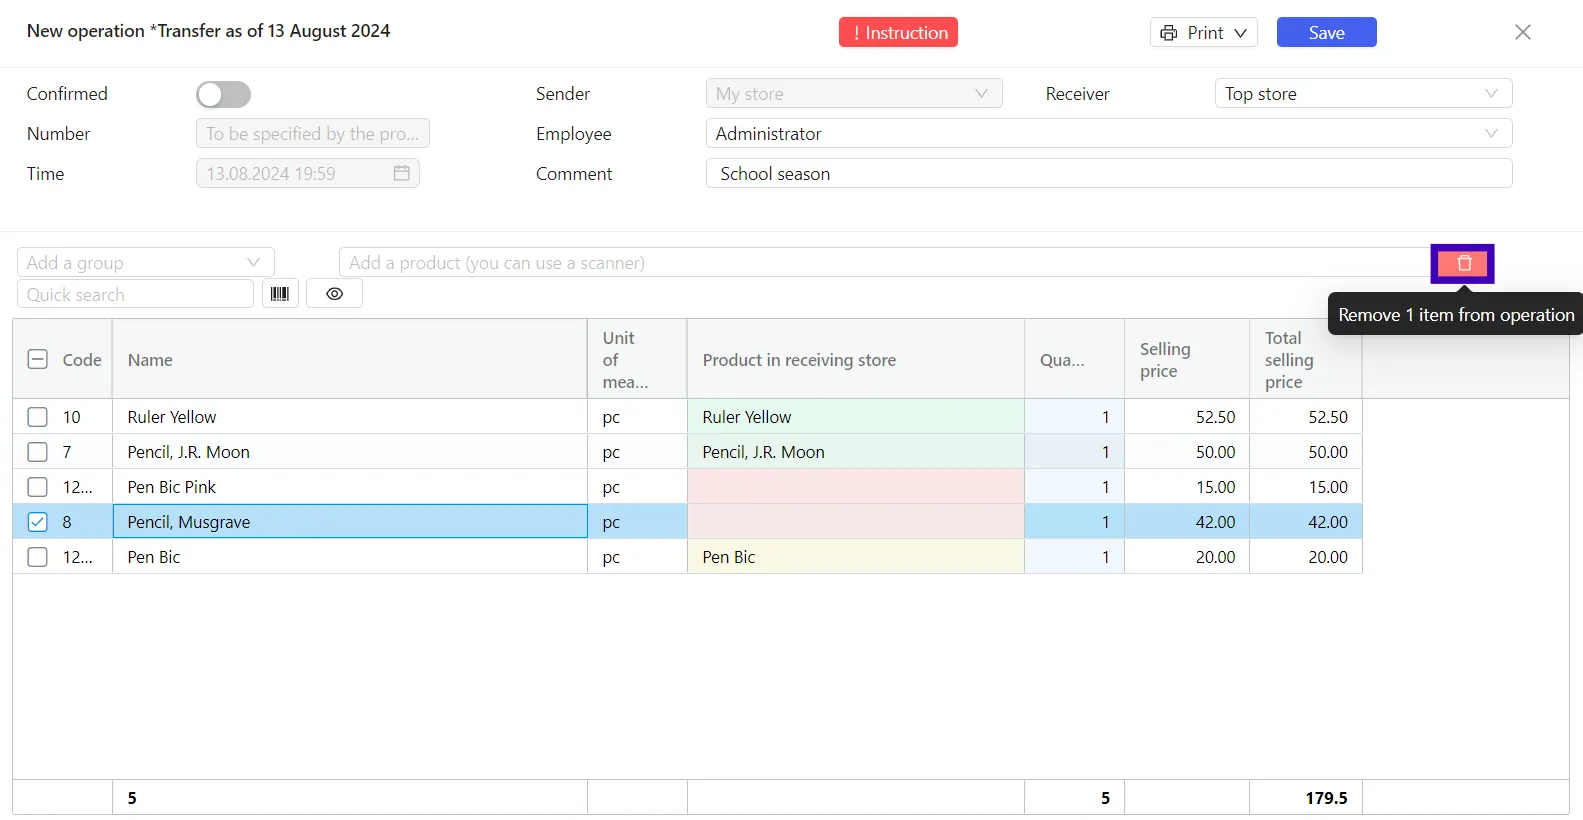
  • If you have added an unnecessary product, just click to select it and delete it via the recycle bin icon.
4

  • Specify the quantity of products which you plan to move to another point of sale (receiving store).

After adding products for the sending point of sale (sending store), the program will run the automatic search for correspondences in the receiving point of sale (receiving store) and put the found correspondences into the operation.

The automatic search is performed:

  • First by UUID (the unique product ID, match by it is considered as Exact);
  • Then by Barcode (match is considered as Exact if there is only 1 product with a such barcode in the receiving store);
  • Then by Code + Product Name parameter (match is considered as Exact if both Code and Product Name coincide).

The program will highlight in the field that identifies the product in the receiving store:

  • With a green color if it exactly matches the product in the sending store.
  • With a yellow color if it partially matches the product in the sending store. If necessary, manually change this product data in the receiving store.
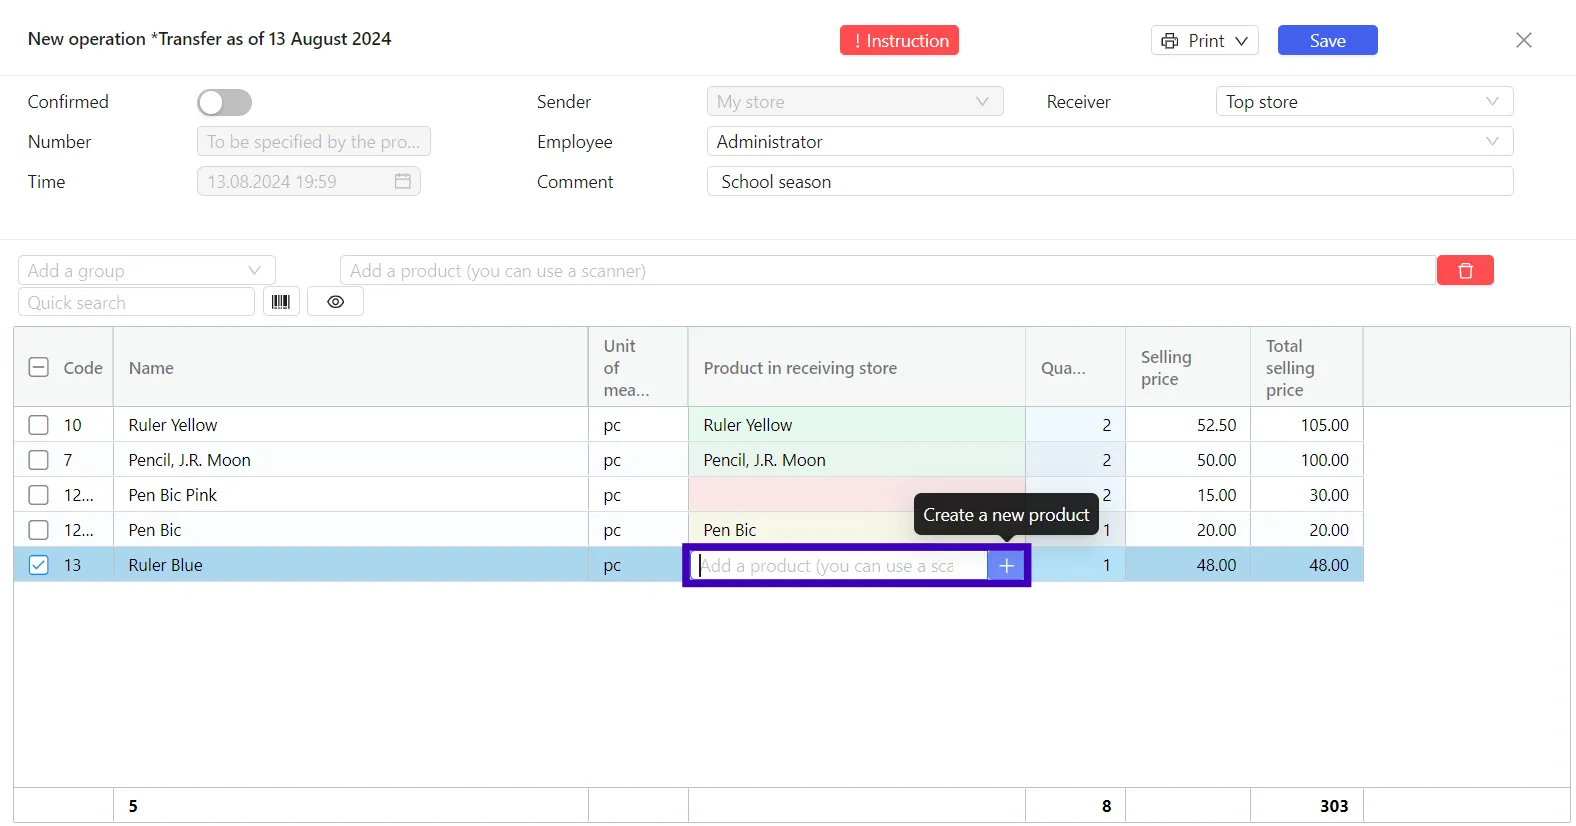
  • With a red color if no matches are found with any product in the sending store. Enter the product data manually.

The program will copy the product card data from the the sending point of sale (sending store).

  • If you move products that have not been previously available in the receiving point of sale (receiving store), press "+" in the line of the product you want to move.
5

Operation saving

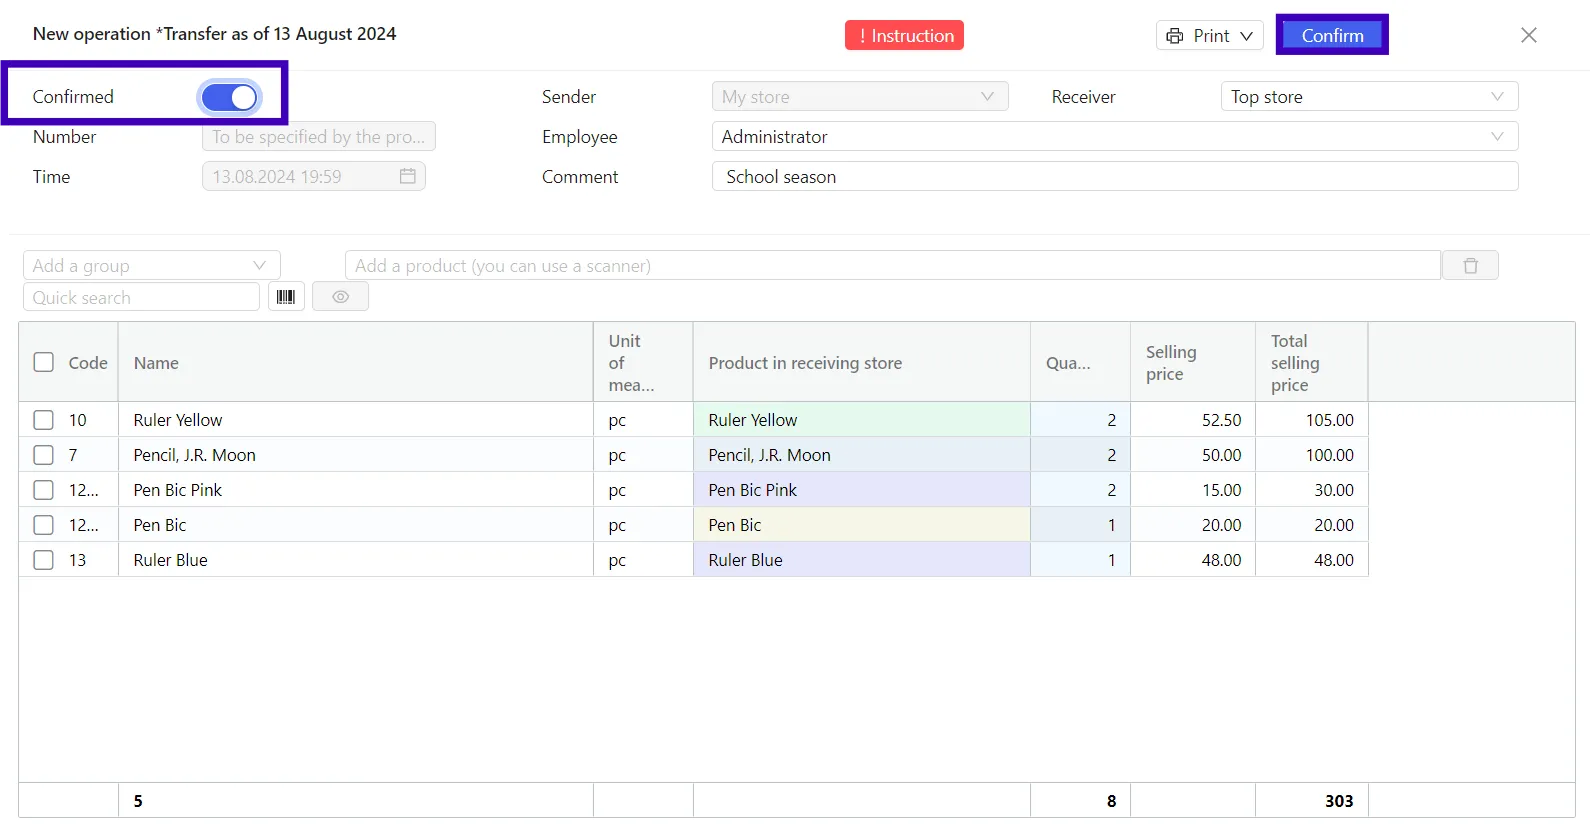
  • Check is the operation if filled out correctly. If your operation is complete, enable the Confirmed slider in the upper right corner and click Confirm.
6

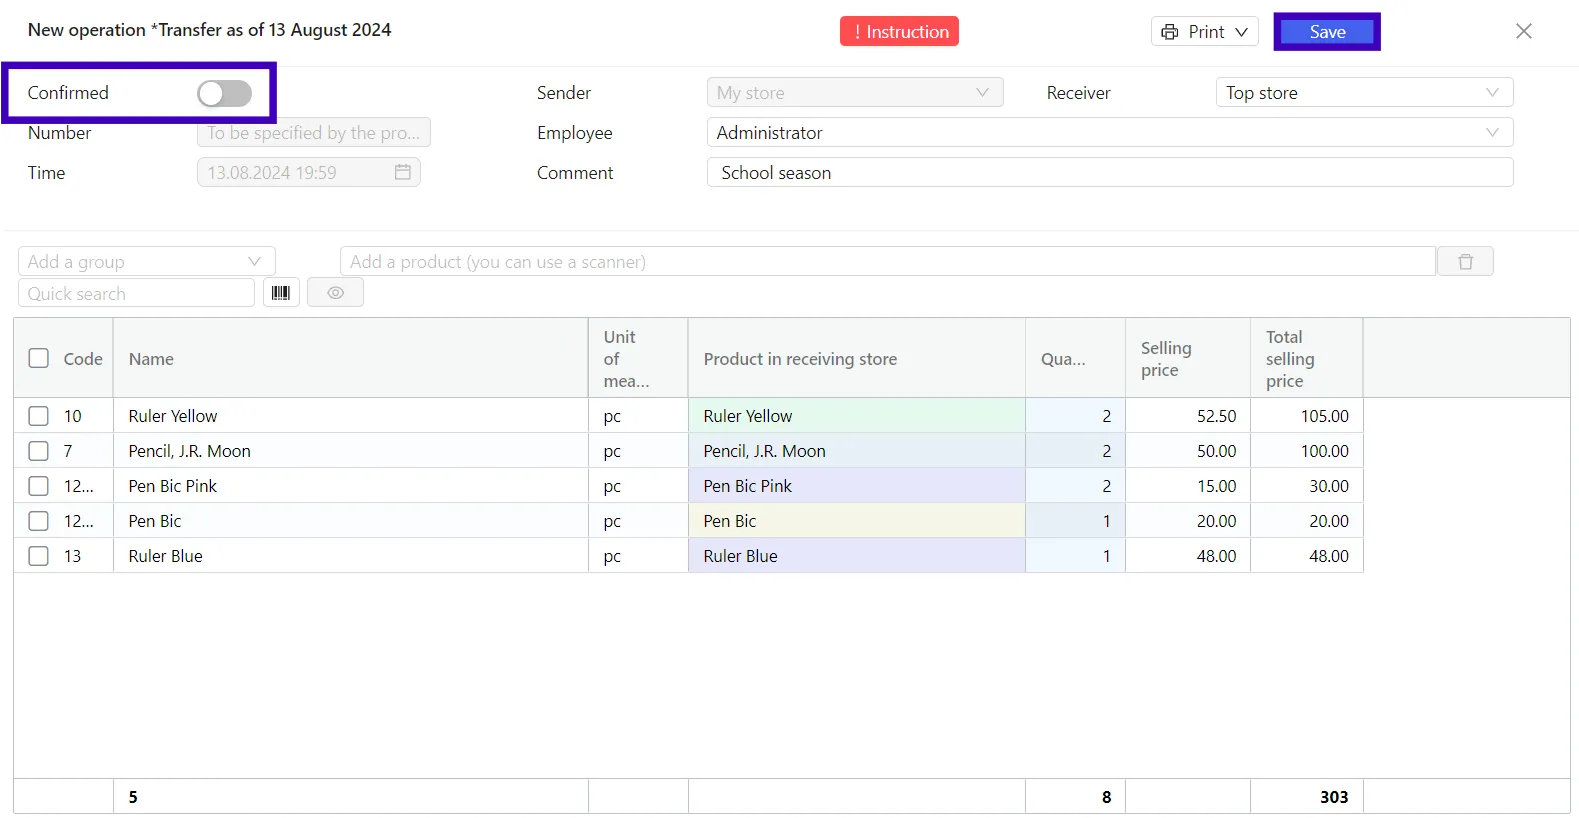
  • If the operation is not complete yet and you want to go back to it later, save the draft: click on the Save button without moving the Confirmed slider to the enabled position.
7

  • You can find a saved draft in the operation registry: Operations→ Inventory control. Double-click to open the draft and continue working.

The difference between a draft and an executed operation is that there is no checkbox next to the draft operation in the Confirmed column.

8

Please note! the operation cannot be edited once it has been executed.

You may also find it useful to review the products catalogs we have prepared for you. You can use them to combine with your product data if needed and upload them to your personal Pulsar account.

In the article
Creation Operation Filling in the tabular part Operation saving
Pulsar PSR логотип
info@psr.com.eg
Resources
Guides Blog License Agreement
Company
About PSR Contact Careers
info@psr.com.eg Privacy Policy
Privacy Policy
© Pulsar for Information technology L.L.C, 2023

All details will be sent to
you via email

By sending your details you agree to the privacy policy

Сall you back

Enter your phone number and we will call you back
By sending your details you agree to the privacy policy
Your request has been
submitted successfully